Quantcast
Channel: Me and food
Viewing all 95 articles
Browse latest View live

Back to the origins :)

$
0
0


Credo che questo post vi stupirà, per più aspetti.

Primo perchè dopo mesi e mesi di ricette dolci (ho controllato, era da ottobre che non si intravedeva nulla di salato su Maf :o) ho finalmente postato una ricetta salata. Non potevo andare avanti così, diciamocelo. Avrei davvero rischiato di farvi andare in una pazzesca crisi iperglicemica ;) Oppure di trasformare Me and food in un baking blog (sì, ci ho pensato più volte...obbiettivamente mi diverte cucinare dolci e soprattutto fotografarli! Perchè?! E' semplice: riescono sempre bene! :) ), ma forse non sarebbe la scelta corretta, senza il salato non so davvero resistere!


L'altro aspetto che potrà sorprendervi è il tipo di ricetta che vi propongo. Udite udite (ci vorrebbe un rullo di tamburi in sottofondo :) ) stiamo parlando di una preparazione tipica delle mie zone, una ricetta della mia tradizione, grande classico della cucina dolomitica: i canederli. Tutti conosceranno i famosi gnocchi di pane allo speck, formaggio o spinaci - le versioni più autentiche di questa ricetta- serviti con burro fuso (si lo ammetto, ogni tanto, quando mi sento in colpa uso l'olio evo ;) ) e salvia. Sono diventati ormai un piatto molto conosciuto, servito ovunque, forse anche troppo diffuso. Infatti, anche se semplice e povero di base, il canederlo deve esser fatto bene, mai troppo 'gnucco' ma nemmeno molle. C'è un equilibrio di consistenza che rende gli gnoches o bales (come si dice in ladino) perfetti.

Io qui vi porto una delle mie ricette preferite, una versione forse a voi nuova, ma nemmeno così fuori dagli schemi: canederli alle barbabietole rosse con ripieno di robiola di capra. Come mio solito, si sa, non sono riuscita a portarvi la preparazione base della ricetta (per inciso, le versioni classiche elencate in precedenza non mi piacciono più di tanto :P) ma un'abbinamento perfetto di sapori, che sono certa vi conquisterà. Il contrasto dolce dell'impasto rosso con il cuore di robiola di capra (o un altro formaggio a vostra scelta), dal sapore più deciso e forte, è divino. Semplici e facili da preparare , sono un modo per utilizzare il pane vecchio di qualche giorno in una chiave diversa e oserei dire chic. Perchè il canederlo, a volte così snobbato, può davvero essere impreziosito. Con gli ingredienti e l'attenzione giusti può diventare un signor primo, che sa di montagna e di calore. Di baita e di camino acceso. Di pranzi invernali in famiglia e di genuino.


Forse questo è il primo post, assieme allo Schmarren, a rientrare nella categoria post della (mia) tradizione. Non sono molti, anzi. Questo non perchè non mi piaccia sfoggiare la cultura culinaria della mia zona (che in realtà parte come cucina povera e contadina, evolutasi successivamente), ma perchè non la sentivo adatta a Me and food. Non stavo negando le mie origini e radici, snobbandole. Era solo questione di sensazioni, o forse di necessità. Da sempre, ho avuto il bisogno di aprirmi, di vedere cose nuove. Di partire, di avere una testa nuova, diversa. Di staccarmi dalla piccola realtà che era la mia Terra, che a volte mi stava stretta, molto. Tutto questo probabilmente si rispecchiava anche nel blog, nella scelta del nome, nella ricerca di ricette provenienti da qualsiasi parte del mondo, nella curiosità che provavo (e provo) nello scoprirle.

Qualche giorno fa però ho sentito questo desiderio. Di pubblicare qualcosa di mio, della mia tradizione. Che esprimesse la mia provenienza e la mia appartenenza.

Ora come non mai ho sentito l'importanza ed il legame con la mia Terra. Forse l'ho capito solo quando ho iniziato a guardarla e viverla con occhi esterni. Ho finalmente realizzato che Lei ci sarà sempre. Ovunque finirò, qualsiasi cosa accadrà.

Io tra le mie montagne potrò sempre tornare.


A rifugiarmi, a correre, a respirare.


ps. ricordate le rape rosse. Credo (sono quasi certa) che tra non molto le rivedrete e forse so già dove andranno a finire :) 


Canederli di barbabietola rossa ripieni di robiola di capra


Ingredienti:


per circa 9-10 canederli piccoli


140 g di barbabietola rossa cotta

50 g di cipolla bianca, tagliata finemente

20 g di burro

130 g di pane raffermo, tagliato a dadini piccoli e di misura uguale

2 uova

50 g circa di robiola di capra o altro formaggio (la quantità dipende dalla dimensione del canederlo)

50 g di farina (+ quella da aggiungere mentre si impasta)

1 cucchiaino di prezzemolo sminuzzato

sale qb


Far appassire le cipolle in una padella antiaderente con il burro, fino a che risultano morbide. In una ciotola mettere il pane e le cipolle, mescolare. Tagliare a pezzi le barbabietole, frullarle con le uova in un mixer da cucina. Unirle al pane e mescolare ancora. Aggiungere infine la farina, il sale ed il prezzemolo, impastare tutti gli ingredienti. Se la consistenza è eccessivamente molle ed appiccicosa (l'impasto è troppo bagnato) aggiungere altra farina, per dare consistenza. Far riposare l'impasto per 15 minuti a temperatura ambiente, coprendolo con uno strofinaccio.

Tagliare a dadini il formaggio che avete scelto poi prendere una quantità di massa, non troppo esagerata, di impasto, appiattire la pallina, mettere al centro qualche dadino di formaggio (uno, massimo due) e chiudere il canederlo, sigillandolo bene affinchè il ripieno non esca o si apra. Cuocere i canederli in acqua salata per circa 15 minuti. Scolarli e servirli passandoli nel burro fuso, guarnirli a piacere con qualche foglia di salvia e una spolverata di parmigiano (ancor meglio se trovate il grana di capra).


Note:

  • se non trovate (o non volete utilizzare) la robiola di capra, potete sostituirla con un altro formaggio come per esempio un erborinato o tipo gorgonzola ( io ne ho fatti metà con il Weissensteiner doppia muffa, una sorta di gorgo austriaco, eccezionale). L'importante è che il gusto sia abbastanza deciso (dovendo far contrasto con il dolce della barbabietola) e che sia un formaggio molle o fresco, ma assolutamente non a pasta dura, altrimenti non si scioglierà e non creerà il cuore filante.
  • Il pane da canederli, raffermo, deve essere 'vecchio' di circa 3-5 giorni, non di più. Per intendersi, deve essere pane secco.
  • Consiglio di assaggiare l'impasto crudo, dopo averlo salato, e di non esagerare fin dall'inizio, ma partendo invece con un pizzico e aumentando successivamemente se necessario (ricordando che l'acqua in cui cuociono è salata e che anche il ripieno è sapido).
  • Potete preparare i canederli il giorno prima per il giorno dopo e conservarli sotto pellicola al fresco, oppure congelarli su un platò infarinato e tenerli in freezer, pronti all'uso.


3 ingredients, 2 recipes :)

$
0
0


Questo è un esperimento, direi un doppio esperimento.

Da una parte una nuova tipologia di post (come sapete siamo in fase di cambiamenti, sperimentazione e mille nuove idee mi frullano in testa :) ). Dall'altra parlo di una modifica nella struttura del post, che non so come prenderete, ma che io voglio provare ad inserire (almeno in una parte delle pubblicazioni). Per una serie di motivi in realtà, che forse un giorno vi racconterò. Non so se a voi (italiani) piacerà o meno, ma sono certa mi “aiuterà” ad accorciare i mie lunghi monologhi abituali ;), cosa che so apprezzerete ;).


Dopo tempo (come sapete tutti i trend e le mode culinarie del momento da me arrivano dopo minimo un anno), ho finalmente trovato le carote viola, che sognavo da molto e che a dire la verità avevo dimenticato, rinunciando all'idea di utilizzarle almeno una volta. Se ricordate, fino a qualche anno fa erano diventate un vero must, come i pomodori gialli e arancioni del resto. Quindi, oltre ad essere in ritardo e immensamente controtendenza (lo sapete che per me non è mai stato un problema questo, anzi), vi presento “3 ingredients, 2 recipes”, ovvero due modi diversi per cucinare tre medesimi ingredienti.

A questo punto ci sarà chi tra voi riderà (a crepapelle), chi chiuderà il post e scapperà da Maf e chi invece (almeno spero che ci sia qualcuno ;) ) troverà quest'idea simpatica e diversa dal solito.


Per iniziare (in realtà non so se riuscirò a crearne molti altri di questi) ho scelto tre ingredienti super basici e sani: le carote viola, la mela e lo zenzero fresco. I due modi per cucinarli? Il primo è a freddo, una centrifuga (appunto la più banale in circolazione, carota-mela-zenzero) classica, semplicemente ottenuta dallo spremere i tre ingredienti. Il secondo modo è una zuppetta, anch'essa molto facile da preparare, con alla base i soliti tre protagonisti.


In realtà non è nulla di che, le ricette/non-ricette sono davvero disarmanti, però credo che l'idea di base sia divertente. Assomiglia un po' a questa, solo che questa volta gli ingredienti in comune sono di più, e le preparazioni sono completamente diverse.


Sarà per il colore (in questo periodo mi diverto a giocarci, oltre che è risaputo che è sano cucinare “colorando” i piatti) che mi fa letteralmente impazzire, sarà perchè sono salutari ma non tristi - anche se quest'anno devo dire che ho risparmiato il mio fisico dalle solite abbuffate festive- ma mi piacciono entrambe da impazzire.


La centrifuga alla mattina è la soluzione per iniziare con energia la giornata (ho letto che le carote viola sono anche ottime per la circolazione) e la zuppa scalda il pancino in queste strane sere di gennaio.


E così posso spuntare anche le carote viola. :)

Ora mancano quelle gialle, bianche, nere e rosse.

Chissà. Forse in un mercatino bio, in Svezia. ;)


Zuppa di carote viola mele e zenzero fresco

per 3-4 persone


Ingredienti:

300 g di carote viola, pelate e lavate

1 mela gala (o granny smith)

1 pezzetto di zenzero fresco (la dimensione dipende da quando piccante volete rendere la vellutata)

1 scalogno

brodo vegetale

olio evo


Tagliare le carote a pezzetti, togliere il torsolo alle mela e pelarla. Pelare anche lo zenzero. Tagliare tutto a tocchetti. Sminuzzare finemente lo scalogno, soffrigerlo in una pentola a pressione con dell' olio evo. Aggiungere le verdure/frutta, coprire con qualche bicchiere di brodo (2-3) e lasciar cuocere per 10 minuti, chiudendo la pentola pressione. Trascorso questo tempo, passare al mini-pimer fino ad ottenere una crema vellutata ed omogenea (aggiungere ulteriore acqua calda se risulta eccessivamente spessa). Servire calda, con qualche crostino o chips di mela.


Centrifuga carote viola mele e zenzero fresco

per un bicchiere medio


Ingredienti:

3-4 carote viola, pelate e lavate

1 mela, pelata e privata del torsolo

1 pezzetto di ginger, pelato

 
Centrifugare tutti gli ingredienti con lo spremitore apposito (la centrifuga). Mescolare la bibita e servire fredda con, a piacere, un po' di zenzero fresco gratuggiato.


English version:


This is an experiment, I would say a double one.

At one hand a new type of post (as you know we're in a phase of change, trial and thousand new ideas are swirling around my head :) ). At the other one I'm talking about a modification of the post's structure. I don't know your reaction about this, but I want to try to insert it (at least in a part of posts). For a series of reasons actually, that maybe I'll tell you one day. I don't know if you (italians) will appriciate it or not, but I'm quite sure it will “help” me to shorten my long and usual monologues ;) thing I know you'll like :)


After much time (as you know all food trends always come to me after min one year), I finally found purple carrots, which I dreamed for long and which, to tell the truth, I forgot, giving up the idea to using them at least on time. If you remember, until a few years ago, they became a real must, as moreover yellow and orange tomatoes. So, beyond being late and extremely countertrend (you know that it never have been actually a problem for me), I present you “3 ingredients, 2 recipes”, that's two different ways to cook the three same ingredients.

At this point there'll be people among you who'll burst out laughing, people who'll quit reading the post and will leave Maf, but someone (at least I hope ;) ) who'll find this a funny and unusual idea.


For the beginning (I don't know really if I'll be able to create many others from these posts) I chose three very basic and healthy ingredients: purple carrots, apple, and fresh ginger. The two ways to cook them? The first is a cold-one, a classic squeeze (exactly the most common existing, that's carrot-apple-ginger), simply done squeezing the ingredients. The second way is a soup, very easy to prepare, always with the base of the three protagonists.


Actually all this isn't anything special, recipes/no-recipes are really disarming, but I believe the beginning idea is funny. It looks a bit like this one, but this time common ingredients are more and preparations are completely different.


It will be for the colour (in this period I have fun playing with them, besides is well-known that to cook plates changing colours is healthy) which I literally love, it will be 'cause they're wholesome and good at the same time – even if I have to say I spared my body from usual festive binges this year – but I like both madly.


The squeeze is the solution to start well and with energy the day ( I red purple carrots are also good for circulation) and the soup warms belly in these strange January evenings.


And now I can tick off purple carrots from the list too :)

Now just yellow, white, black and red ones are missing.

Who knows. Maybe in a bio-market, in Sweden. ;)

 
Purple carrots apple and ginger soup

for 3-4 people
 

Ingredients:


300 g purple carrots, peeled and washed

1 gala apple (or granny smith)

1 piece fresh ginger (the size depends on how much spicy you want the soup will be)

1 shallot

vegetable broth

evo oil (extra virgin olive oil)


Cut carrots into pieces, remove the apple core and peel it. Peel ginger too. Cut all into pieces. Mince thinly shallot, sautè it in a pressure cooker with some evo oil. Add vegetables/fruit, cover with some glasses of broth (2-3) and cook for 10 minutes, closing the pressure cooker. After this (so when all vegetables are cooked), mix the soup with an hand blender until you get a velvet and uniform consistency (add other hot water if it results too dense). Serve it hot, with toasted bread or apple chips.


Purple carrots apple and ginger fresh squeeze

for a medium glas
 

Ingredients:

3-4 purple carrots, peeled and chopped

1 apple (granny smith for example), peeled and without core

1 small piece fresh ginger, peeled


Put all ingredients in the juicer and squeeze them. Mix the drink and serve it fresh, with (if you like it) a bit of grated fresh ginger.


Chocolate beet cake. Finally.

$
0
0


Il momento giusto. Quello in cui tutto coincide, ha senso, si compie. Quello che aspettavi, da tempo. Che a volte avevi immaginato (non troppo, per non rovinare la sorpresa). Quello che arriva quando non lo pensavi, che ti sorprende. Che ti fa sorridere, capire.


C'è sempre un momento giusto, per qualsiasi cosa.

Per un viaggio, per scoprire un posto, per un libro, per alcune parole, per uno sguardo, per una promessa. Per una novità, per una crisi, per una risposta. Per una rinascita, una rivoluzione.


E c'è anche il tempo giusto per una ricetta.

Quando tutti gli ingredienti sono pronti, magari dopo molto, perchè sono stati introvabili a lungo (e ahimè, io ne so qualcosa a proposito ;) ).

Quando trovi la ricetta quasi perfetta, dopo aver cercato, modificato, personalizzato la tua versione.

Quando il risultato ti illumina, ti riempie. E sorridi, dopo una giornata non propriamente ok.


Avevo atteso un po' per la"Beet". L'avevo vista da Katie, ovviamente. Come con la "Guinness", mi affascinava l'uso di un ingrediente così particolare in un dolce. In realtà non era il fatto di usare una verdura in una torta a sorprendermi. Se ricordate qui vi avevo raccontato della torta dolce di zucchine di nonno (ahhh, nostalgia estiva ;) ). In realtà era la barbabietola in sé, ad incuriosirmi. La rapa rossa, con la quale ho sempre avuto un rapporto strano. Da piccina non la cercavo più di tanto, non si è mai vista girare per casa. Poi qualche tempo fa l'ho riscoperta (con i super canederli ;) ). Mi attrae il colore (da morire!), la consistenza. La dolcezza.


La "Beet"è quasi indescrivibile. Soffice, spugnosa ed umida. Assomiglia alla sua sorellina, per aspetto (crosticina fuori, morbida dentro). Per il profumo inconfondibile del cacao. La Beet però è più leggera. Col suo colore bordeaux, intenso, che in cottura diventa mogano. Leggermente meno compatta, si sbriciola tra le mani. Elegante, decisa, equilibrata. Alternativa (non resisto al colore fucsia che va ad unirsi agli ingredienti secchi ;)) e divertente :)


Io, a fini puramente estetici, l'ho ricoperta con una generosa colata di cioccolato fuso (sì, devo dire che la foto rende bene :P), ma credetemi che con una semplice spolverata di zucchero a velo, o addirittura liscia, sarà fenomenale. :)


Un bicchiere di latte, un divano, un buon film e la "Beet".

Sì, era questo il momento. :)


 Chocolate beet cake (torta al cioccolato e rape rosse)

tratta e modificata da qui


Ingredienti:

80 g di cacao amaro in polvere, setacciato

180 g di farina bianca, setacciata

2-3 cucchiaini di lievito per dolci bio

190 g di zucchero bianco

260 g di barbabietola rossa, cotta

3 uova

200 ml di olio di mais

1 pizzico di vaniglia Bourbon in polvere


per decorare:

*a piacere cioccolato fondente fuso, zucchero a velo o altro frosting (magari al formaggio fresco :P)


In una ciotola capiente mescolare cacao, farina, vaniglia e lievito. Aggiungere poi lo zucchero.

Frullare le barbabietole in un mixer da cucina, fino ad ottenere una purea liscia. Unire le uova, una per volta, lasciando montare il composto (che raddoppierà di volume, all'incirca).

Formare una fontana tra gli ingredienti secchi e aggiungere il composto fucsia di barbabietole, sbattendo con delicatezza, per non smontare eccessivamente l'impasto.

Imburrare uno stampo dal diametro piccolo (18 cm) e dai bordi alti e lisci, versarci l'impasto e cuocere a forno caldo per 50 minuti circa. Controllare la cottura con la prova-stecchino. Lasciare raffreddare e decorare a piacere*.


Note:

  • come per la "Guinness" prestate attenzione alla cottura: deve formarsi una crosta fuori e rimanere bagnata all'interno.
  • come la maggior parte delle torte di questo tipo, il giorno dopo è ancora più buona :P


 English version:


The right moment. That one when all coincides, makes sense, carries out. That one you were waiting for, for a long time. Sometimes you imagined it (but not too much, to don't spoil the surprise). That one that comes when you didn't expect it, that amazes you. It makes you smile, understand.


There's always a right moment, for everything.

For a travel, for discovering a place, for a book, for a gaze, for a promise. For news, for a crisis, for an answer. For a rebirth, a revolution.


And there's the right time for a recipe too.

When all ingredients are ready, maybe after much time, since they were lost for long (uh, I know damn well about this ;) ).

When you find the almost perfect recipe, after researches and modifications to personalize your version.

When the result lights up you, it fills you. And you smile, after a not really ok day.


I waited a bit for the “Beet” (in english it sounds funny ;) haha!). I saw it the first time by Katie, obviously. As it happened with the "Guinness", I was enchanted from the use of a very particular ingredient in a sweet recipe. Actually I wasn't surprised by using a vegetable in a cake. If you remember, here I told you about my granpa's sweet zucchini bundt cake (ahhh, summer memories ;) ). It was actually the betroot itself to intrigue me. Beet, with which I've always had a strange rapport. When I was a little girl I didn't look for it so much, we usually didn't have it at home. Then, a while ago, I rediscovered it (with the super canederli ;) ). I like the colour (to madness! ), the consinstency. The sweetness.


The "Beet" is almost indescribable. Terribly fluffly, spongy and moist. It looks like her sister, for the aspect (outside crusty, inside soft). For the unmistakable fragrance of cocoa. But The "Beet"  is lighter. With its intense bordeaux colour, that during the baking becomes mahogany. Slightly less compact, it crumbles in hands thanks to the softness. Elegant, strong but balanced. Alternative (I can't resist to the fuchsia colour mixed with dry ingredients ;). Funny!


I covered it with a huge flow of melted chocolate, just for aestethic purposes (yeah, have to say the pic creates well the idea ;)), but trust me it's incredibly yummy even just with a simple wipe of icing sugar, or even without anything on the top. :)


A glass of milk, a comfortable couch, a good film and the "Beet".

Yes, this was the moment. :)


Chocolate beet cake

from here (modified)


Ingredients:

80 g cocoa powder, sifted

180 g plain flour, sifted

2-3 tsp bio-baking powder

190 g caster sugar

260 g betroot, cooked

3 eggs

200 ml corn oil

1 pinch vanilla Bourbon powder


to decorate:

*to your liking melted dark chocolate, icing sugar (dusted) or an other frosting (cream-cheese frosting for ex.)


Mix cocoa powder, flour, vanilla and baking powder into a large bowl. Add then sugar. Pureè beets in a food mixer until you get a velvet mash. Put eggs, one at a time, whipping the mixture (it will double, approximately).

Make a fountain in the dry ingredients and add slowly the fuchsia beets mixture, mixing lightly and whipping it.

Grease a cake pan with a small diameter (18 cm) and tall and smooth sides, pour the cake mixture and cook to 180°/355F (hot oven) for about 50 minutes. Check the baking with a toothpick. Cool the cake and decorate to your liking*.


Notes:

  • as you do for the "Guinness" pay attention to the baking: there should be a firm crust outside and a "wet" inside.
  • as the main part of this kind of cakes, it is better and more delicious the day after :P


Buchteln in Paris :)

$
0
0


A volte capita di fermarsi.
Di interrompere quel ritmo frenetico, metodico, vincolato e programmato della realtà.
Quello che era scritto, confermato, riservato.
Quello mascherato, un po' ostentato, condiviso.


Guardarsi indietro. Provare a rivivere momenti, ripercorrerli, senza ritrovarsi. Non riconoscersi come protagonisti, sentirsi spettatori. Incuriositi ma incapaci di intendere. Vivere un presente inaspettato, diverso, ancora legato al passato. Poco nitido. Surreale. Travolgente. Sconvolgente. Insensato. Impegnativo. Forse, necessario.


Li ricordo ancora, i Buchteln caldi di Parigi. Quelli che vi ho nominato qui. Sì, avete capito bene. Buchteln a Parigi. Quelle piccole e soffici palline di pasta lievitata ripiene di marmellata, che nella tradizione ladina vengono servite con l'immancabile salsa alla vaniglia (terribilmente südtiroler, per me no grazie ;)! ).
Li ho ancora in testa. In un posto speciale, di Parigi. In realtà per una serie infinita di motivi. Perchè obbiettivamente i Buchteln, nella capitale francese, non centrano un granché. Forse sarebbe stato più “normale” (odio, profondamente, la definizione di normalità e qualsiasi sua declinazione, aggettivale o avverbiale), parlarvi di un fantastico pain au chocolat (ok, credo che arriverà anche quello prima o poi ;), ne vado matta!) o di una fragrante baguettecasalinga (manca! Prossimamente devo provarci a farla in casa. Senza pretese di superare i mastri fornai parigini, ça va sans dire ;) ).
Eppure credetemi, non avrei potuto fare diversamente. Il profumo inebriante di queste focaccine, che servite tiepide sono la fine del mondo, su quel tronchetto di larice. Ero a Parigi, vero. Ma mi sentivo come a casa. Mi sentivo cullata, un po' viziata. Rapita dalla magia e dall' atmosfera che solo quella città sa dare. Passeggiare per il Quartiere latino mi regalava momenti di pace e senerità. Mi immedesimavo. Una piccola (e fasulla) bohèmien, incerta e fragile per le vie ripide e strette del 5eme. Un atelier di scarti di alta moda dove acquistare il più bel abitino nero di sempre, un salon de thé dalle pareti verde acqua in una nascosta stradina interna, una libreria di vecchi, impolverati ed ingialliti volumi di Baudelaire.
Seppur insolita, questa combinazione buchteln-Paris rimarrà per sempre nelle mie memorie. E forse non è detto che questa città, ancora una volta, presto mi salverà.
Forse è lì che tutto ha avuto inizio, forse è lì che tutto deve ricominciare.
Ma un saluto ed una dedica, la faccio anche all'origine autentico di questo dolce: la Boemia (noi ladini, come gli austriaci ed i tedeschi lo abbiamo ereditato).
Forse anche lì, in parte, un nuovo inizio avrà il suo più stravagante (e sostanzialmente utopico) compimento. :)


Buchteln
tratta e leggermente modificata da Semplice e buono, la cucina autentica delle Dolomiti, Athesia


Ingredienti:
100 ml di latte tiepido
50 g di zucchero
25 g di lievito
350 g di farina, setacciata
2 uova, a temperatura ambiente
1 pizzico di vaniglia Bourbon in polvere
2 /3 cucchiaini di scorzetta di limone bio, grattugiata
20 g di burro fuso

per il ripieno:
marmellata di mirtilli rossi

Mescolare 50 ml di latte tiepido con lo zucchero ed il lievito, fino a sciogliere tutti gli ingredienti. Mettere da parte e lasciar riposare per 15 minuti. In una ciotola capiente versare la farina, aggiungere il liquido latte-zucchero-lievito ed iniziare ad impastare, unendo le uova, il latte rimasto, la vaniglia, la scorza di limone e il burro fuso. Continuare a lavorare fino ad ottenere un impasto omogeneo e leggermente appiccicoso.
Far lievitare coperto in un ambiente caldo per almeno un'oretta.
Trascorso il tempo per la lievitazione, stendere su un piano infarinato la pasta con uno spessore di circa 5 mm. Tagliare dei quadrati della grandezza di 6x6 cm.
Disporre al centro di ogni quadrato un cucchiaino di marmellata e chiudere con un altro quadrato, sigillando accuratamente i bordi. Lavorare tra le mani fino a dare la forma di una pallina. Disporre i buchteln in una stampo da torta imburrato, uno vicino all'altro. Spennellare le focaccine con del burro fuso e lasciare riposare altri 15 minuti. Cuocere a 170° per circa 35-40 minuti (la superficie si scurirà facilmente, per questo controllate l'interno con uno stecchino). Servire tiepidi con una generosa spolverata di zucchero a velo.

Note:
  • nella versione originale del dolce (altoatesino) la marmellata che viene utilizzata è quella di albicocche. Io preferisco quella di mirtilli rossi o ribes, però potete scegliere quella che più vi piace (anche di prugne, come da tradizione boema).
  • Più farete lievitare l'impasto più soffici risulteranno le focaccine. In questo modo tenderanno a rimanere più morbide anche nei giorni successivi, se conservate in pellicola. 

     
    English version:

    Sometimes it happens to stop.
    To suspend that rabid, systematic, bound, planned rythm of reality.
    That one which was written, confirmed, reserved.
    That one masked, a bit displayed, shared.

    Looking back. Trying to live again those moments, to retrace them, without finding yourself. Don't recognize yourself as protagonist, feeling like a spectator. Curious but unable to understand. Living an unexpected, different and still bound to past, present. Less bright. Surreal. Overwhelming. Upsetting. Senseless. Demanding. Maybe, necessary.

    I still remember the hot Buchteln of Paris. Those ones I mentioned here. Yes, you understood right. Buchteln in Paris. Those small and fluffy balls of dough stuffed with jam, those which are served with vanilla sauce in ladin tradition (terribly südtiroler, for me no thanks ;)! ).
    I've still got them in head. In a special place, of Paris. Actually for a long list of reasons. Objectively Buchteln, in the french capital, don't identify a lot of sense. Maybe it would be more “normal” (hate, deeply, the definition of normality and every declension of it, adjectival or adverbial), to talk about a fantastic pain au chocolat (ok, think it will come sooner or later anyway) or a crunchy homemade baguette (missing! Soon I have to try it at home. Without claims to beat Parisian bakers, ça va sans dire ;) ). But trust me, I couldn't have done differently. The heady smell of these scones, which are the end of the world if you serve them lukewarm, on that larch log. I was in Paris, it's true. But actually I felt like at home. I felt cherished, a bit spoilt. Raptured by the magic and the atmosphere that only that city can give. Walking trough the Latin Quarter donated me a sens of peace and serenity. I emphatize. A small (and false) bohémien, so unsure and frail around the steep and narrow streets of 5ème. One atelier of high fashion scraps where you find the prettiest little black dress ever, one salon de thé with aqua green walls in a hidden tiny street, a old bookstore with dusty and yellowed volumes by Baudelaire.
    Although it's unusual, this combination Buchteln-Paris will stay for ever in my memories. And it's not said that this city will rescue me soon, once again.
    Maybe it's there that all began, maybe it's there that all has to start again.
    But a special greetings and a dedication go to the origin of this sweet: Bohemia ( ladins as austrians and germans have inherited it).
    Maybe it's there, partly, that a new beginning will have its weirdest (and essentially utopic) fulfillment. :)


    Buchteln
    adapted from Semplice e buono, la cucina autentica delle Dolomiti, Athesia

    Ingredients:
    100 ml lukewarm milk
    50 g sugar
    25 g brewer's yeast
    350 g flour, sifted
    2 eggs, room-temperature
    1 pinch vanilla Bourbon powder
    2/3 tsp bio lemon zest, grated
    20 g melted butter

    for the stuffing:
    cranberry jam

    Mix 50 ml of lukewarm milk with sugar and yeast, until all is melted. Put away and let rest it for 15 minutes. Pour flour in a large bowl, add the milk-sugar-yeast liquid and start to knead, combining eggs, left milk, vanilla, lemon zest and melted butter. Keep on working it until you get a homogeneous and lightly sticky dough. Let it rise, covered in a warm place, for on hour at least.
    After the leavening, spread the paste on a covered in flour plane with the depth of 5 mm. Cut squares with a 6x6 cm size.
    Arrange in the center of each square a teaspoon of jam and close with an other square, sealing the edges accurately. Give it the shape of a ball, working it in your hands and putting each buchtel in a buttered cake pan, side by side. Brush the sweet with melted butter and put it resting for 15 minutes. Cook the scones to 170° for 35-40 minutes (the crust will darken, for this check the inside part with a toothpick).
    Serve them lukewarm with a huge wipe of icing sugar.

    Notes:
  • in the original version of the sweet (that one südtiroler ;) ) the used jam is apricots one. I personally prefer the cranberry one or currants one, but you really can choose that one you like more (plums jam too, as the bohemian tradition wants)
  • More you rise the knead, more the scones will be fluffy. In this way they will stay soft for more days, if you conserve them in plastic wrap.

About an aussie breakfast ;)

$
0
0


Non sono abituata, a godermi la mattina.

A svegliarmi con calma, presto.

Con un'energia strana, diversa. Non tumultuosa, forse positiva. Con un sorriso, leggero. Non smagliante o esagerato.

Apro la finestra, le imposte, sento freddo. Chiudo gli occhi. Respiro. Lo faccio intensamente, profondamente. Sento il peso di ogni inspirazione e la liberazione di ogni espirazione. Lo faccio ancora, ed ancora. Apro gli occhi e vedo la neve. Per un momento, uno solo, sono come vorrei: giovane, selvaggia e libera. Nient'altro. Con la testa altrove, certo. Senza pensieri, per un po'. Percepisco quel pizzico di incoscienza, bramo la leggerezza che ancora manca.


Mi preparo piano, vivo ogni momento, lo apprezzo. Scendo in cucina, accolta dal calore e dall'atmosfera che solo quella stanza sa regalare. Metto il grembiule (e non mi importa se tutte dicono che fa old e nonna), e inizio a preparare la colazione, come si deve, solo per me. Un bicchiere di succo d'arancia bio, un caffè (oggi, americano), una mela succosa. Poi prendo la farina. Questa volta, la prima nella mia vita, che lievitadasola. La setaccio. Poi zucchero, latte e uova. Quelli ci voglion sempre. E anche il burro. Esageriamo. E ora? Pikelets?! Sìììì! Non per tradire i fratelli americani. Non credo di farcela. I pancakes sono insostituibili, inimitabili. I cugini australiani, sono una declinazione aussiedei crumpets inglesi, in realtà. A mio parere, li superano. Spugnosi, tanto, alti e soffici. Molto diversi, curiosi.

Pastella pronta, pancake-panpure, ora solo burro. Eh sì, perchè anche se faccio fatica, bisogna imburrare per bene la padellina, ad ogni frittella. Non c'è storia.

Cappa alla massima potenza e qualche finestra aperta, inizia l'impresa (non mi smentisco mai). Impasto dappertutto, mille piatti, piattini e palette.

La torre, alta e piuttosto in bilico, di pikelets fumanti. Ci siamo quasi. Una banana, tagliata a fettine. Nocciole, tritate molto grossolanamente. Ci guarnisco la torre. Infine, lo sciroppo d'acero. Una generosissima colata di sciroppo d'acero. Ecco. 


Tolgo il grembiule, soddisfatta. Prendo le frittelle, la mia forchetta preferita (vintage). Mi volto e guardo il caos che ho creato. Penso che dovrei, mettere a posto, che sarebbe meglio. Non mi importa. Può aspettare.

Vado alla finestra, mi siedo e li addento. Guardo fuori. Neve. Penso a me. Basta.


Respiro intensamente, di nuovo.

Sorrido.

Timidamente. 


Pikelets con banana, nocciole e sciroppo d'acero

Tratta e largamente modificata da Elle a tavola, gennaio 2014


Ingredienti:
per i pikelets:

320 g di farina chelievitadasola (autolievitante ;) ), setacciata

90 g di zucchero

1 uovo

300 ml di latte

100 g di burro, fuso


per guarnire:

una banana

nocciole, tritate grossolanamente

sciroppo d'acero o miele


In una ciotola capiente mescolare farina e zucchero. Sbattere leggermente l'uovo e il latte, in un altro recipiente. Aggiungere la parte liquida agli ingredienti secchi, sbattendo energicamente con un frusta, senza formare grumi. La pastella risulterra molto densa e montata. Unire il burro fuso, mescolando. Preparare una padella antiaderente ben imburrata. Versarci qualche mestolo di pastella (in base alla dimensione della padella) e far cuocere le frittelle. Far dorare entrambi i lati, senza bruciarli. Continuare fino ad esaurire l'impasto, ricordando di imburrare la padella quando ricominciate. Servire caldi, con banana, nocciole e sciroppo d'acero, o con quello che più a voi piace. :)


Note:


  • essendo molto ricchi e non propriamente leggeri, consiglio di non esagerare con la guarnizione. Sono buonissimi semplici, con della frutta fresca, classico zucchero a velo o marmellate.


English version:

I'm not used to enjoy the morning.
To wake up quietly, early.
With a strange and different energy. Not turbolent, maybe positive. With a light smile. Not dazzling or exagerated.
I open the window, the blinds, I feel cold. I close my eyes. I breathe. Intensely and deeply. I feel the weight of each inhaling and the realease of each expiration. I do once again, and again. I open my eyes and see the snow. For a moment, just one, I'm as I would to be: young, wild and free. Nothing else. With the head elsewhere, sure. Without thoughts, for a while. I sense that pinch of inconsciousness, I long for the levity still missing.

I get ready slowly, I live the instant, I appriciate it. I go down in the kitchen, welcomed by the warmth and the atmosphere of this magic room. I wear my sweet apron (and I don't care if all say it's for oldies/granmas), and I prepare myself the breakfast, properly, just for me. A glass of fresh orange juice, an american coffee (yes, even if I'm italian sometimes I like it), a pulpy apple. Then I keep flour. This time, the first one in my life, self-raising. I sift it. Then sugar, milk and eggs. Those are always necessary. And butter too. Let exagerate.
And now? Pikelets?!?! Oh Yessss! Not to cheat the american brothers. Don't think to be able to do it. Pancakes are irreplaceable, inimatible. Aussiecousins are actually the australian version of english crumpets. In my opinion, they're better. Spongy, very, high and fluffy. Very different, terribly curious.

Batter's ready, my pancake-pantoo, now it's the turn of butter. Yes, 'cause even if it's hard for me, the small pan must be carafully buttered everytime. There's no match.
Range hood on the max power and some open window, let start the challange (I'm always the same).
Dough everywhere, thousand small saucers, plates and cake slices.
The high and unsafe tower of steamy pikelets. Nearly there. A banana, sliced. Minced hazelnuts. I garnish the tower. At last the marple sirup. A generous flow of it. Here we are.

I take off the apron, satisfied. I pick up pikelets, choose my fav fork, the vintage one. I turn and watch the huge mess I've done. I'm thinking I should tidy a up, it would be better. But I don't care. It can wait.
I go next to the window, sit down and bite them. I watch outside. Snow. I think of me. Stop.

I breathe intensely, again.
Smile.
Shyly.

 
Pikelets with fresh banana, hazelnuts and marple sirup 
Largely adapted from Elle a tavola, January 2014

Ingredienti:

for pikelets:
320 g self-raising flour, sifted
90 g sugar
1 egg
300 ml milk
100 g butter, melted

to garnish:
a banana
hazelnuts, minced
marple sirup or honey

Mix flour and sugar in a large bowl. Beat lightly milk and egg in an other receptable. Add the liquid part to dry ingredients, whipping powerfully with a whisk. The batter will be very thick and whipped. Add up melted butter, combining all ingredients. Prepare a buttered pan. Pour in it some spoonfuls of batter (it depends on the size of the pan) and let them cook. Make them golden for both sides, without burning them. Go on until the dough is over, keeping in mind to butter the pan everytime you start again. Serve them hot with banana, hazelnuts and marple sirup, or everytihng you like most.

Notes:
- pikelets are pretty nutritious and not so light, so don't exaggerate with garniture. They're heavenly yummy in the simple way they are, with fresh fruit, classic icing-sugar or jams.

My asian-way cooked salmon (with sojasaucehoneyginger marinade!) :)

$
0
0


Non cucino molto etnico, devo dirlo.

L'ho scoperto tardi, tardissimo. Da buona Heidi-girl ho dovuto aspettare un bel po' per conoscerlo. Sono sempre stata curiosissima, di assaggiare e di sperimentare. Fin da piccola. Per motivi prettamente tecnici e pratici non è stato possibile per tempo e la mia permanenza tra canederli e polenta è stata assai lunga. ;)
Il mio primo jappo (ovviamente composto da solo sushi) a 16 anni, il primo indiano a 17, il primo libanese a 18 , il primo tex-mex (è da considerare etnico?!) a 19. Contando (ovviamente) solamente gli assaggi seri di cucina extra-italiana (e cancellando il cinese a 10 anni, con il quale ho ancora un rapporto difficile, non so perchè!).

Impazzisco per i sapori particolari, lontani. A volte il solo fatto di poter “degustare” culture e tradizioni gastronomiche mi fa viaggiare, con la testa ovviamente (credo il mezzo che ho utilizzato maggiormente per la mia scoperta dell'universo ;) ). Terre sconosciute, nelle quali non ho mai messo piede, fisicamente. Che ho “ visto” in un mondo puramente metafisico e sensoriale.
A volte una serata in realtà come le altre può diventare una piccola (ed illusoria) fuga, tra i profumi, i piatti e i sapori di posti magici, affascinanti e così distanti.


Come avrete potuto intuire, quindi, adoro mangiare etnico. Fuori. Al ristorante o da amici ( e io sono tremendamente fortunata, a riguardo! ;) ). A casa però lo cucino raramente. E la maggior parte delle volte con mille modifiche che rendono il risultato tremendamente infedele dall'originale.
La miso soup con una miriade di alghe-verdurine, spessa (sembra quasi un minestrone all'orientale, niente a che vedere con quella dei sushi-bar, che mi fa letteralmente impazzire!). Il riso alla cantonese mum-version (anche questo nemmeno minimamente simile all'originale, a parte il nome). E poi il salmone marinato. A modo mio. Tranci (o bocconcini, come preferite) di salmone cotti nel wok. Io li chiamo all'orientale - nella marinata utilizzo ingredienti provenienti da cucine orientali, ormai praticamente diventate parte della cultura gastronomica occidentale, hihi! - data la presenza della salsa di soia e dello zenzero fresco. Poi ci metto il miele, per contrastare il sapido della soia. E qui ogni tentativo di avvicinarmi all'etnico svanisce.
Obbiettivamente non saprei come definire questa ricetta. Potrebbe sembrare giapponese (forse una sorta di cugino del Teriyaki, lontano però ;) ), credetemi che la sua classificazione è un'impresa ardua.
Forse (addirittura!) non lo possiamo nemmeno chiamare etnico. Bah. :)

Fatto sta che questo è uno dei miei modi preferiti (se non quello in assoluto) per cucinare/mangiare il salmone. Dire che è semplice da fare, è esagerare. E' vergognosamente banale :)

4 ingredienti (in totale, e non scherzo), zero fatica (fa tutto la marinatura), dovrete solo cuocere il pesce (nel wok viene meglio, creerà la giusta glassa).

Allora, sono riuscita a convincervi? ;)

ps. piace da morire anche ai non-amanti dell'etnico. Il trucco?! Non dite da cosa è composta la marinatura! ;) 


Salmone marinato all'orientale (alla mia maniera)

Ingredienti:
per 2 persone

1 trancio di salmone fresco, privato della pelle (è perfetto anche il filetto)
3 cucchiai di salsa di soia, bio
1 pezzetto di zenzero fresco, sbucciato
1 cucchiaio di miele (millefiori o d'acacia)
olio evo

Tagliare il pesce nella forma che preferite, tranci o bocconcini. Preparare la marinatura mescolando la salsa di soia, il miele e lo zenzero tagliato a fettine sottili. In un piatto fondo o una terrina posizionare il pesce e versarci la marinata. Lasciare riposare per almeno 30-40 minuti in frigo, o in luogo fresco, coperto da pellicola. Cuocere il pesce nel wok caldo (o padella antiaderente) con un filo di olio evo per qualche minuto. Aggiungere il liquido rimasto dalla marinata e lasciar caramellare, facendo restringere la glassa. Servire con riso bianco o altri contorni.

Note:
  • la stessa preparazione può essere utilizzata con il tonno, se volete trovare un'alternativa. Il salmone però è più morbido e si scioglie in bocca, essendo la carne più grassa (a me piace molto di più!).
  • potete rendere la marinata più decisa e forte con un pizzico di coriandolo in polvere oppure un pizzico di cinque spezie cinesi.

  
English version:

I don't cook a lot ethnic food, I have to say it.

I discovered it late, terribly late. As a perfect Heidi-girl does, I had to wait a lot to experience it. I've always been curious to taste and try new flavors. Since I was a little girl. Unfortunately, it hasn't been possible for a long time for mainly technical and pratical reasons and so my permanence around “candereli” and polenta was pretty long. ;) My first japanese (obviously composed only by sushi) when I was 16, the first indian when I was 17, the first lebanese when I was 18 and the first tex-mex (is it definable ethnic?!) when I was 19. Obviously I'm just considering the serious degustations of no-italian food (deleting my chinese experience when I was 10, with which I still have a strange rapport, I don't know why!).

I'm crazy for particular and distant flavors. Sometimes the only possibility to sample new cultures and gastronomic traditions makes me travelling, with the head obviously (I think it's the “transport” I used the most for my discovery of universe ;) ). Unknown lands, which I've never seen phisically but merely in a metaphysic and sensorial world.
One evening, not so different from the usual, can sometimes become a small (and misleading) escape thorugh the smells and plates of magic, fasciniting and far away places.

As you could understand, so, I love eating ethnic, dining it out above all. At the restaurant or at friend's (and I'm so lucky regarding this! ;) ). But I rarely cook it at home, and if I do it most of the times there are so many modifications, making the result so terribly unauthentic to the orginal version.
Miso soup with lots of wakame seaweeds and vegetables, very thick (looking more like an oriental minestrone, nothing similar to that one served in sushi-bars, which I completely love <3). Cantonese rice with mum-version (it's the same for this, nothing close to the authentic recipe, exept for the name). And then marinated salmon. My way cooked. I named it asian-way cooked salmon since in the marinade I use two typical asian products, which are soja sauce and fresh ginger, effectively two almost occidental became ingredients. I put then honey to contrast the salty flavor of soja. And here each attempt to get close to ethnic food disappears.
Objectively I wouldn't know how to define this recipe. It could look like a japanese preparation (maybe as a cousin of Teriyaki, a far away kin ;) ), but trust me, its classification is a hard work.
Maybe we can't neither (even!) call it ethnic. Bah. :)

Anyway this is one of my fav ways (or the one I love the most, mmm, not easy to say) to cook/eat salmon. Saying it's easy to prepare is exaggerated. It's shamefully banal. :)

4 ingredients (in the total, and it's not a joke), no efforts (marinade does all alone), you'll just have to cook the fish (in a wok is better, it'll create the right caramelised glaze).

So, did I convince you? ;)

ps. Everybody loves this plate, no ethnic-lovers too. The trick?! Don't say what's in the marinade! ;)


 My asian-way marinated salmon

Ingredients:
for 2

one fresh salmon steak, without skin (pavè part is perfect also)
3 tablespoons soja sauce
1 piece fresh ginger, peeled
1 tablespoon honey (“thousand flowers” or acacia)
evo oil

Cut the fish into the shape you prefer, steaks or nibbles. Prepare the marinade mixing soja sauce, honey and sliced fresh ginger. In a deep plate or in a terrine place the fish and pour the marinade. Let rest for almost 30-40 minutes in the fridge, or in a cold place, covered with plastic wrap. Cook the fish in a hot wok (or in a pan) with a blade of oil for a few minutes. Add the left liquid from the marinade and let candy and reduce the glaze. Serve with white rice or other side dishes.

Notes:
  • the same preparation can be used with fresh tuna, if you want to find an alternative. But salmon is softer and it melts in the mouth, since the “meat” is fatter (and I like it more!).
  • You can give to the marinade a stronger and spicy flavor adding a pince of coriander (powder) or a pince of 5-chinese spices mix.


S'mores (brownies) :)

$
0
0

L'erba umida, l'aroma del legno e dei boschi, il suono del falò, acceso.
Un cerchio di amici, il vestitino di jeans, una coperta a scacchi, i ceppi di albero su cui sedersi.
Il lago, calmo ed immenso.
Note di nostalgia, guardando il cielo stellato. I mitici '60.
Una ghirlanda di fiori di campo tra i capelli.
Una mano, quella mano, vicina.
Il profumo della gioventù.
Di un sorriso incerto, una timida speranza, un impulso del cuore.
Una candela accesa, un diario ingiallito colmo di insensate parole.
E poi l'universo. In un solo respiro.

Fin da piccola, ho sempre avuto un forte debole per l'idea del campeggio estivo. Non quello all'italiana (camper+campeggioattrezzato+tuttiicomfortdiunanormalevaanzasolosuquattroruote) o nemmeno quello del campus estivo per ragazzi. 


Nei film americani vedevo di frequente una scena specifica. Il campeggio tra amici, in calde notti d'estate, tra la immense montagne canadesi o dello stato del Washington. Quei week end improvvisati, quelli dell'ultimo momento. In un bosco sperduto, lontano. Un mondo quasi irreale. L'immancabile laghetto ed il pontile di legno scricchiolante, per sedersi e - a gambe all'aria – con le punte dei piedi, disengnare cerchi a filo d'acqua. Le confidenze ed i segreti confessati tra ragazze, mentre i maschietti raccolgono la famosa legna per il fuoco. Sguardi complici, parole silenziose e sane risate. Un barbecue quasi perfetto, con l'insalata di patate. La birra ghiacciata, dalla bottiglia. Una tavolata rustica nel prato. Le lanterne volanti da lanciare a fine serata, con un plaid avvolto al corpo e mille desideri per un fututo grandioso. I lumini accesi nell'acqua. I bagni pazzi di mezzanotte. Le tende pronte per accogliere quelle misere ore di sonno previste per la notte e le canzoni country-rock, cantate o strimpellate attorno ad un falò acceso. I marshmallows abbrustoliti sul rametto. Gli s'mores. Il dolce da campeggio per eccellenza. Quel panino di biscotto integrale ripieno di marshmallows sciolti al fuoco e cioccolato a pezzi morbido, quasi fuso. Il must-have di ogni campeggio americano/canadese che si rispetti. È qui, infatti, che la scena del campeggio, quella famosa, si fa sempre più nitida nella mia mente. Quella delle chiacchiere post-barbecue, attorno al fuoco centrale, con i bastoncini in mano e questi dolciumi super americani dorati, pronti per essere addentati in un fantastico s'more


S'more, l'abbreviazione di “something more”, quel qualcosa in più che completa il quadro. La serata. Un dolce buffo e unico, che solo in alcuni precisi momenti ha senso.

Fantasticavo, come è mio solito fare, ed immaginavo questo mio piccolo desiderio. Il campeggio da sogno. Quello che sembra di vivere sfogliando le meravigliose pagine patinate di Kinfolk.<3

Ogni ricetta però come dicevano un po' di tempo fa qui, ha il momento e luogo giusto per essere realizzata. Gli s'moresin quel normalissimo pomeriggio di febbraio non avrebbero avuto senso, obiettivamente.

Stavo cucinando un brownies extrafondente (strano eh?! ;)). Poi ho ricordato che tempo prima avevo preso dei marshmallow bianchi (non chiedetemi il perchè, sono rimasti in dispensa per parecchio tempo dato che in purezza non riesco a mangiarli). La torta stava cuocendo in forno, guardavoquesti piccoli trocnhcetti di zucchero senza capire cosa mi stesse frullando in testa. Poi ho realizzato. 
L'avevo vista da Jamie, quest'idea. Una base di brownie al cioccolato classico coperta da cicciosi marshmallow dorati e una sbriciolata di biscotti secchi in superficie. È una sorta di s'more scomposto, gli stessi gusti ripresi in un dolce di natura completamente differente. Forse più sensato nel mio contesto.

Ero seduta alla finestra (ormai un mio cliché, assolutamente non letterario, credetemi, lo faccio davvero! ;) ) con la mia fetta di dolce e una tazza xxl di tè caldo (sono un'accoppiata incredibile, fidatevi!). 
Rivedevo la scena. Ne sentivo il sapore.

Di quello s'more che aspetterò. Fino al mio primo, unico e vero campingda sogno.


S'mores brownies
tratta e modificata da Jamie magazine, gennaio 2014

Ingredienti:
100 g di burro
200 g di cioccolato fondente al 75%
4 uova
250 g di zucchero grezzo o di canna
100 g di farina, setacciata
1 cucchiaino di lievito per dolci bio
30 g di cacao amaro in polvere
marshmallows bianchi (circa 180-200 g)
30 g di biscotti secchi ( i tipo digestive sarebbero meglio ma anche i tipo “Oro Saiwa” vanno bene)

Sciogliere burro e cioccolato a bagnomaria. Sbattere le uova con lo zucchero fino a che il composto si gonfia, risultano soffice e chiaro. Aggiungere a quest'ultimo il cioccolato sciolto, la farina, il lievito ed il cacao e mescolare. Versare l'impasto in una teglia da brownies e cuocere per 25-30 minuti a 200° (controllare la cottura con lo stecco). Lasciare raffreddare il dolce, una volta pronto. Coprire la superficie del brownie con i marshmallows e passare al grill del forno per 3 minuti, finchè sono leggermente dorati. Spolverare con una sbriciolata di biscotti e servire tipiedi.

Note:

- la base di brownie è grandiosa anche come ricetta singola, non occorre dirlo. In questo caso è perfetta perchè avendo un gusto quasi tendente all'amaro (data la presenza del cioccolato al 75%) contrasta meravigliosamente la dolcezza quasi esagerata dei marshmallows, equilibrando il dolce che non risulta per nulla stucchevole.


English version:

The damp grass, the aroma of woods, the sound of a burning pyre.
A circle of friends, that jeans dress, a checkered blanket, some logs where to sit.
The calm and huge lake.
Nostalgic notes, watching the starry sky. The legendary 60s.
A wreath with wildflowers in the hair.
A hand, that one, so close.
The fragrance of youth.
Of an unsure smile, a shy hope, an impulse from the heart.
A glowing candle, a faded diary, full of senseless words.
And then the Universe. In a single breath.

Since I was a little girl, I've always had a strong weakness for the idea of summer camping. Not the italian-style one (camper+equippedcamping+everykindofnormalcomfortjustonfourwheels) or neither those summer campings for teenagers.

When I was watching american movies I frequently saw a specific and clear scene. Camping with friends, in hot summer nights, through those immense canadian or Washington state's mountains. Those improvised week-ends, organized at the last minute. In a lost and far away wood. An almost unreal world. The unavoidable small lake and the creaky wood jetty to sit down head over heels, drawing circles on the water with the tips of toes. Confidences and confessed secrets among girls, while guys are picking up the wood for fire. Knowing looks, quiet words and healthy laughs. An almost perfect barbecue, with potato salad. Frozen beer, from the bottle sure! A rustic table on the field. Flying lanterns at the end of the evening, with a warm plaid bound around the body and thousand desires for a great future. Little lights on the water. Those crazy midnight baths. Ready tents for the few sleep hours expected for the night and country-rock songs sung and strummed around a burning bonfire. Roasted marshmallows on a thin branch. S'mores. The camping sweet par excellence. That whole-cookies sandwich stuffed with hot marshmallows and melted chocolate pieces. It's a must-have for each worthy of respect american/canadian camping. At this point the scene of my dreamy camping is brighter more and more. That one with post-dinner chatters , around the central fire, with wood sticks and golden marshmallows, done to be put in a fantastic s'more.

Exactly, s'more. The contraction of “something more”, the thing that completes the vignette. The event. A funny and unique sweet, that has sense just in particular moments.

I was thinking ( as I usually do) and I was imagining that small desire. The rustic summer camping. That one you feel like living browsing the slick pages of Kinfolk.

But each recipe, as I said here, has its right time and its right place. S'mores in that normal afternoon of February wouldn't have had sense, objectively.

I was baking an extradark brownies (so strange right?! ;) haha!) and I remembered I bought some classic marshmallows (don't ask me why, they stood for so long in the pantry since I honestly can't eat them alone). The cake was baking in the oven, I was looking at these candies, without understanding what was swirling in my mind. Then I realized.

I saw this idea by Jamie. A classic chocolate-brownie base covered with fluffy golden marshmallows and dry crumbled biscuits on the top. It's kind of dismantled s'more, same flavours in a completely different sweet. Maybe more reasonable in my case.

I was sitting by the window (by now it's a cliché, absolutely not literaly, trust me, I really do it!) with my brownie slice and an xxl mug of extremely hot tea (they're really an incredible couple! :) ). 

I saw the scene again. I feel the taste of it.

Of that s'more I'll wait for. Until my first, unique and true dreamy camping.


S'mores brownies
adapted from Jamie magazine, January 2014

Ingredients:
100 g butter
200 g 75% dark chocolate
4 eggs
250 g brown sugar
100 g plain flour, sifted
1 tsp bio baking powder
30 g cocoa powder
white marshmallows (more or less 180-200 g)
30 g dry biscuits (digestive ones are better but “Oro Saiwa” are good anyway)

Melt butter and dark chocolate in a bowl over a pan of simmering water (bain marie technique). Beat the eggs with sugar until you get a fluffy and pale mixture. Add the melted choco into the eggs, then put flour, baking powder and cocoa powder and mix. Pour into a brownie tin and bake to 200° (hot oven) for 25-30 minutes, until the crust is crispy. Leave to cool. Cover the top of the brownie base with marshmallows and let it grill in the oven for 3 minutes, until the candies are golden. Scatter over the crumbled biscuits and serve lukewarm.

Note:
  • the brownie base is a great recipe for a simple and classic darkchoco brownie, goes without saying. In this case it's really perfect since 75% dark chocolate gives a lightly bitter flavor, that's fantastic with the almost exaggerated sweetness of marshmallows.

Portland (OR).

$
0
0


Immaginavo di mangiare queste quesadillas in un picnic. Sì, uno dei miei leitmotiv “narrativi” preferiti.
Con gli amici, di sempre. Un tavolo basso, preso ad un mercatino vintage di Portland, apparecchiato in un'affascinante e caratteristica (terribilmente strampalata) maniera. Con bicchieri, posate e piatti spaiati, anch'essi di un mercatino dell'antiquariato. I taglieri di legno antichi, una tovaglia di cotone leggermente stropicciata beige e tovaglioli ricamati a mano. Un vaso sbeccato con peonie fresche, al centro. Bianche, rosa pallido e fucsia. Un telo e qualche cuscino sparso dove sedere. Qualche istantanea di una polaroid. Il cestino di vimini con la tracolla di pelle. La birra fredda, doppio malto, belga.
Su un prato verde, ovviamente. Con l'erba un po' alta, incolta.
Non troppo lontano dal faro però. Quasi a picco sul mare dell'Oregon. 


Un pranzo primaverile, fresco ma deciso. L'aria ancora frizzante in una splendente giornata di sole, con un cappello di paglia in testa e la brezza dell'oceano sulle braccia scoperte.
Queste piccanti quesadillas di pollo e patate dolci (non la batata, la patata americana) accompagnate da una guacamole speciale e da una salsa a freddo di pomodoro e cipolla.

Solo cose semplici e sincere.
Come un sorriso, uno sguardo.

...

Avevo voglia di raccontarvi una storia, oggi. Così, semplicemente.
Immagini che prima disegno in testa, poi trascrivo su un taccuino nero, o rosso.
Su una panchina, ancora immersa dalla neve, a 2600 m.
E per un attimo, uno solo, mi sento in cima al mondo.


Quesadillas con pollo e patate dolci (+ guacamole speciale e salsa fredda al pomodoro)
la ricetta è di Jamie (magazine, gennaio '14), le dosi e il procedimento li ho modificati io

ingredienti:

per le quesadillas:

2 patate dolci
metà cipolla rossa, pelata
2 peperoncini rossi freschi, tritati e privi di semi
1 cucchiaino di peperoncino in polvere (o a scaglie)
1 petto di pollo
1 cucchiaino di paprika dolce
1 cucchiaino di cumino in polvere
4 tortillas di farina
50-60 g di formaggio tipo cheddar o emmenthal
1 manciata di coriandolo fresco tritato
olio evo
sale

per la salsa*:

l'altra metà della cipolla rossa, pelata
6 pomodori (a vostra scelta)
1 peperoncino fresco, tritato e privato dei semi
1 manciata di coriandolo fresco, tritato
olio evo
sale


per la guacamole speciale:
2 avocado maturi (al punto giusto)
1/3 della salsa*

Per prima cosa, preparare il mash di patate dolci. Preriscaldare il forno a 180°. Pelare le patate dolci, lavarle, tamponarle e tagliarle a cubetti. Metterle in una teglia con un filo di olio, condire leggermente con sale e pepe e cuocere in forno. Nel frattempo tagliare a spicchi sottili la cipolla. Quando sono trascorsi 20-30 minuti dall'inizio della cottura delle patate, aggiungere alla teglia le cipolle, il peperoncino (sia fresco che in polvere/scaglie) e ancora un filo d'olio. Mescolare ed infornare di nuovo per ultimare la cottura di ulteriori 20-30 minuti ( le patate devono essere ben arrostite ma morbide e non eccessivamente croccanti). Quando le patate saranno pronte, lasciar da parte e preparare le salse di accompagnamento.

Per la salsa al pomodoro a freddo, tritare finemente i pomodori e l'altra metà della cipolla rossa. In una ciotola mescolarli con il peperoncino fresco e il coriandolo fresco. Condire con un filo d'olio e un pizzico di sale. Assaggiare ed aggiustare eventualmente.

Per la guacamole speciale, pelare gli avocado e tagliarli a pezzi. Metterli in un mixer da cucina con un terzo della salsa a freddo preparata prima, azionare la macchina per ottenere una purea densa e omogenea.

Far riposare le due salse al fresco.

Recuperare le patate+cipolle, che si saranno quasi raffreddate e passarle al mixer per creare il mash, un purè.

Per il pollo, tagliare il petto a pezzi medi o a striscioline e metterlo in una pirofila. Condire con dell'olio, la paprika, il cumino, il peperoncino fresco, un pizzico di quello in polvere. Mescolare e salare leggermente. Lasciar marinare per almeno 10-15 minuti.
Cuocere poi la carne in una padella antiaderente poco oleata, aggiungendo anche la marinatura, arrostendo la carne in modo che si crei una crosticina esterna, ma che l'interno rimanga morbido e non stopposo.

Quando anche la carne è pronta, preparare le quesadillas. Prendere una tortilla, spalmarci sopra uno strato di mash, aggiungere qualche bocconcino di pollo, grattugiarci una generosa dose di formaggio e una spolverata di coriandolo fresco. Chiudere con un'altra tortilla e continuare con lo stesso procedimento fino ad esaurire gli ingredienti.

Nella stessa padella del pollo, pulita con un po' di carta assorbente, tostare le quesadillas per 2-3 minuti per parte, fino a che diventano croccanti e dorate e il formaggio si è leggermente sciolto.

Tagliare le quesadillas a spicchi e servire con le salse.


Note:
  • potete servire le quesadillas anche a freddo. Perderanno un pochino il loro carattere leggermente filante (formaggio), ma sono buonissime anche a temperatura ambiente. Sono, appunto, un'ottima idea per i primi picnic primaverili fuori porta.
  • la ricetta è semplicissima, la preparazione è un po' lunga ma assolutamente facile. L'importante è organizzarsi e se seguirete il mio procedimento non avrete nessun problema.
  • Nell'insieme il piatto è decisamente piccante (d'altronde è una ricetta messicana no?! ;)) essendoci il peroncino (fresco e in polvere) sia nella carne, che nelle patate e anche nella salsa a freddo. Ovviamente le dosi possono essere personalizzate: diminuite o aumentate a seconda dei vostri gusti. Se i vostri commensali non amano il piccante, non occorre dirlo, cambiate programma e ricetta :P)
  • gli avocado della guacamole devono essere maturi al punto giusto, sono la chiave della buona riuscita della salsa. Il mio consiglio è di aspettare (non troppo, altrimenti saranno inutilizzabili) e di cercare un prodotto valido. Purtroppo non è sempre facile, per questo vi consiglio di rinunciare alla salsa se non trovate gli avocado giusti. Credetemi: meglio restare senza guacamole piuttosto che prepararne una immangiabile! ;)


    English version:

    I was imaging me eating these quesadillas in a picnic. Yep, one of my fav “narrative” leitmotiv. With friends, those most important ones. A short table, bought in a vintage market of Portland, set with a fascinating and characteristic (terribly odd) way. With unpair glasses, cutlery and plates, everything also coming from a antique market. Old wood cutting boards, a lightly creased beige cotton tablecloth and hand-embroidered napkins. A chipped vase with fresh peonies, in the middle. White, light pink and fuchsia. A cloth and some scattered pillows where to sit. Some snap-shots with a polaroid. A wicker basket with the leather shoulder strap. A cold belgian beer, double malt.
    On a green lawn, obviously. With high and fallow grass.
    Not too far away from the lighthouse. Almost sheer over the sea of Oregon.

    A spring lunch, fresh but strong. The still sparkling air in a shiny sunny day, with a straw hat on the head and the ocean breeze on bare arms.
    These spicy quesadillas with chicken and sweet potatos (they're not american potatos) served with a special guacamole and a cold salsa made with tomatoes and onions.

    Only simple and honest things.
    Like a smile, a gaze.


    I felt like writing a story, today. Easily.
    Pictures that I first draw in head and then I write down in a black or red notebook.
    On a bench, still immersed from lots of snow, on 2600 m.
    And for an istant, just one, I feel on the top of the world.


    Quesadillas with chicken and sweet potatoes (+ special guacamole and cold salsa with tomatoes and onions)
    the recipe's is from Jamie (magazine, January '14), doses and method are modified by me

    Ingredients:

    for quesadillas:
    2 sweet potatoes
    a half red onion, peeled
    2 fresh red peppers, minced and without seeds
    1 tsp ground hot pepper or chili flakes
    1 chicken breast
    1 tsp sweet paprika
    1 tsp ground cumin
    4 flour tortillas
    50-60 g cheese (cheddar or emmenthal)
    a handful fresh coriander, minced
    evo oil
    salt

    for the salsa*:

    the other half of the red onion, peeled
    6 tomatoes (the type you like most)
    1 fresh red pepper, minced and without seeds
    1 handful fresh coriander, minced

    for special guacamole:

    2 ripe avocados (at the right point)
    1/3 of the salsa*

    First prepare the sweet potatoes mash. Preheat the oven to 180°. Peel the potatoes, wash, dry and cut them into pieces. Put them in a tray with a line of oil, season a bit with salt and pepper and cook in oven. In the meantime cut the onion into thin wedges. After 20-30 minutes of cooking, add the onion, the pepper (both fresh and ground) to the potatoes and another line of oil. Mix all and go on with the oven cooking for other 20-30 minutes (potatoes should be well roasted but at the same time soft and not extremly crunchy). When potatoes are ready, let them aside and prepare the salsas.

    For the cold salsa with tomatoes and onions mince finely tomatoes and the other half of the red onion. Mix them in a bowl with the fresh pepper and the fresh coriander. Season with a line of oil and a pinch of salt. Taste and adjust if necessary.

    For the special guacamole,peel avocados and cut them into pieces. Put them in a blender or a food processor (mixer) with a third of the before prepared salsa and mix until you get a thick and homogeneous mash.

    Let the two salsas rest in a cold place.

    Recover the potatoes+onions (almost cooled) and mix them in the blender to create the mash.

    For the chicken, cut the meat into medium pieces or into little strips and put it in a pan. Season with the oil, then add paprika, cumin, fresh pepper and a pinch of ground red pepper. Mix and salt a bit. Let it marinate for almost 10-15 minutes.
    Cook it in a pan with a few oil and the marinade liquid too. Roast the meat until you have an external crust but the inside part has is soft and absolutely not gristly.

    When also the chicken is ready, prepare the quesadillas. Take one tortilla, spread a layer of sweet potatoes mash over it, add some piece of chicken, grate a huge dose of cheese and a wipe of fresh coriander. Close with an other tortilla on the top and go on until you finish your ingredients.

    In the same pan you cooked the chicken, cleaned with a bit of blotting paper, toast the quesadillas for 2-3 minutes for each side, until they get golden and crispy and cheese is lightly melted.

    Cut quesadillas into wedges and serve with the salsas.

    Notes:

  • You can also serve quesadillas cold. They'll lost a bit their stringy character (cheese) but they're great served at room temperature. They're right an awesome idea for the first outdoors spring picnics.
  • The recipe's so easy instead the preparation is a little long but absolutely simple. The important thing is to organize all, if you'll follow my procedure you won't have any problems.
  • The plate is definitely spicy (it's a mexican recipe, right?! ;) ) because of the presence of pepper (fresh and ground) both in the meat and in the potatoes, oh, and in the cold salsa too. Obviously you can personalize the doses: reduce or increase red pepper as you like. If your tablemates don't like spicy food, goes without saying, change the plan and the recipe :P)
  • avocados have to be ripe at the right point, they're the key for the good success of the salsa. My advice for you is to wait (not too much, otherwise they'll become useless) and to look for a good product. Unfortunately that's not so easy, I know. For this I suggest to renounce to the salsa if you don't find the right avocados. Trust me: it's better without guacamole than with an uneatable one! ;)

For the love of burgers ❤

$
0
0


Non sono tipo da junk food.
Dopo alcuni (peraltro pochi ed unici) tentativi a 10 anni da “McTutto” (ricordo che allora andare in città al fast-food era il passatempo domenicale più in voga, sinceramente dalla ancor dubbia utilità e incerto fascino), per lunghi anni ho abbandonato qualsiasi pietanza che si avvicinasse al concetto di cibo spazzatura.


Il sapore finto (per di più gommoso) e piatto del cibo confezionato mi ha sempre dato ai nervi. Odiavo -odio tutt'ora- il fatto che ogni boccone (dalla patatina fritta al pane da hamburger) avesse lo stesso aroma. Il gusto confuso e difficilmente decifrabile, a metà strada tra una borsa di plastica e un pezzo di cartone, ha fatto in modo che per molto tempo hamburger, patatine fritte, nuggets & co. non apparissero nel menu da scegliere durante i miei pasti fuori casa. O meglio, mi correggo, da allora sono sempre stati piatti che sceglievo solamente nei posti che conoscevo (per così dire “fidati”). Per quanto riguarda le freisriuscivo a chiudere un occhio, per il resto invece, sono stati sapori che avevo evidato, quasi dimenticato.

Credo di non mangiare un nugget da almeno sei anni (e non mi mancano nemmeno, sarò sincera), la stessa cosa però non è successa con gli hamburger. A volte cedevo al burger pronto del macellaio di fiducia che mettevo in un panino semplice al latte (perchè quelli confezionati, con il loro sapore dolciastro da “scaduto” non li sopporto proprio, non so se rende l'idea ;)), o a quello del mio baracchino storico (che però, obiettivamente, hamburger vero non è).

Poco tempo fa (oserei dire finalmente) dopo una delle lunghe chiacchierate su birra e cibo con lei (tra parentesi massima esperta di burger homemade :P), ho deciso di farlo a casa.
Sissignori. Dalla a (il vero pane da hamburger) alla z (il burger in sè, partendo dal macinato fresco e aggiungendo qualche sapore per renderlo speciale).

E dopo tanto tempo, posso dire di aver mangiato di nuovo un vero burger. Con il suo panino, i suoi condimenti (rigorosamente freschissimi), la carne buona.
La ricetta per il pane e per i burger di carne sono di Katie , mentre per il ripieno (in entrambe le versioni, vegetariana e non) mi sono affidata a Jamie (con le mie solite modifiche, più o meno “pesanti” :)).

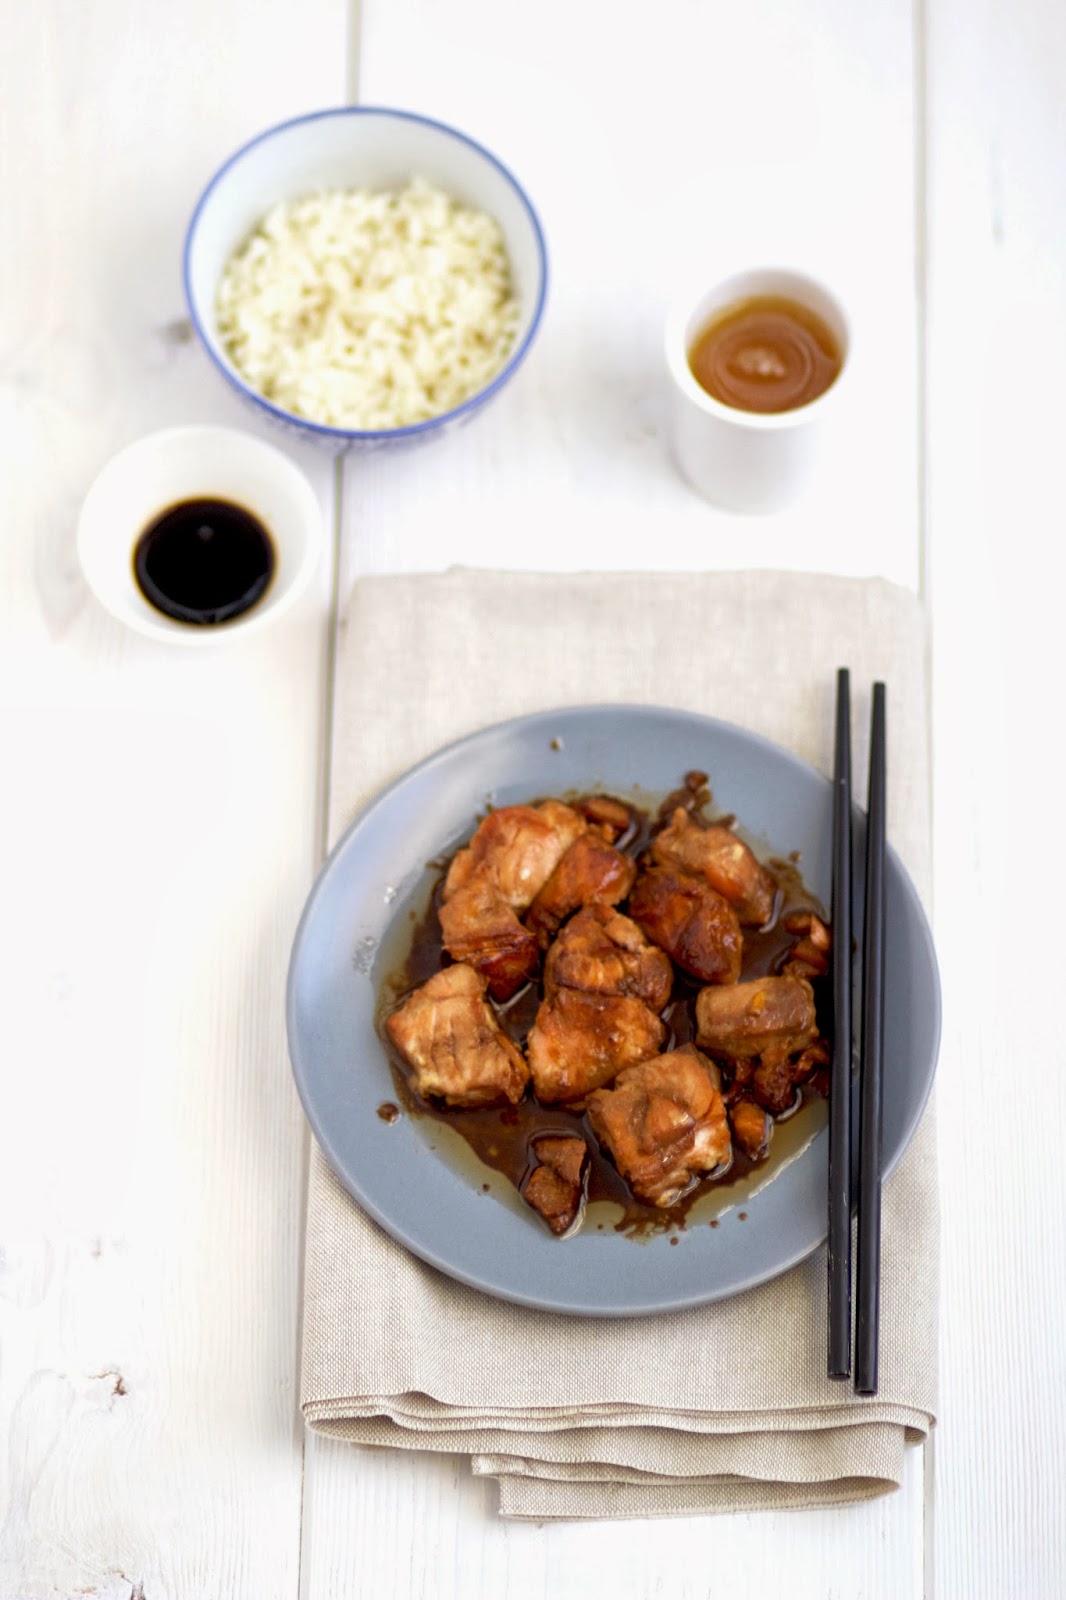
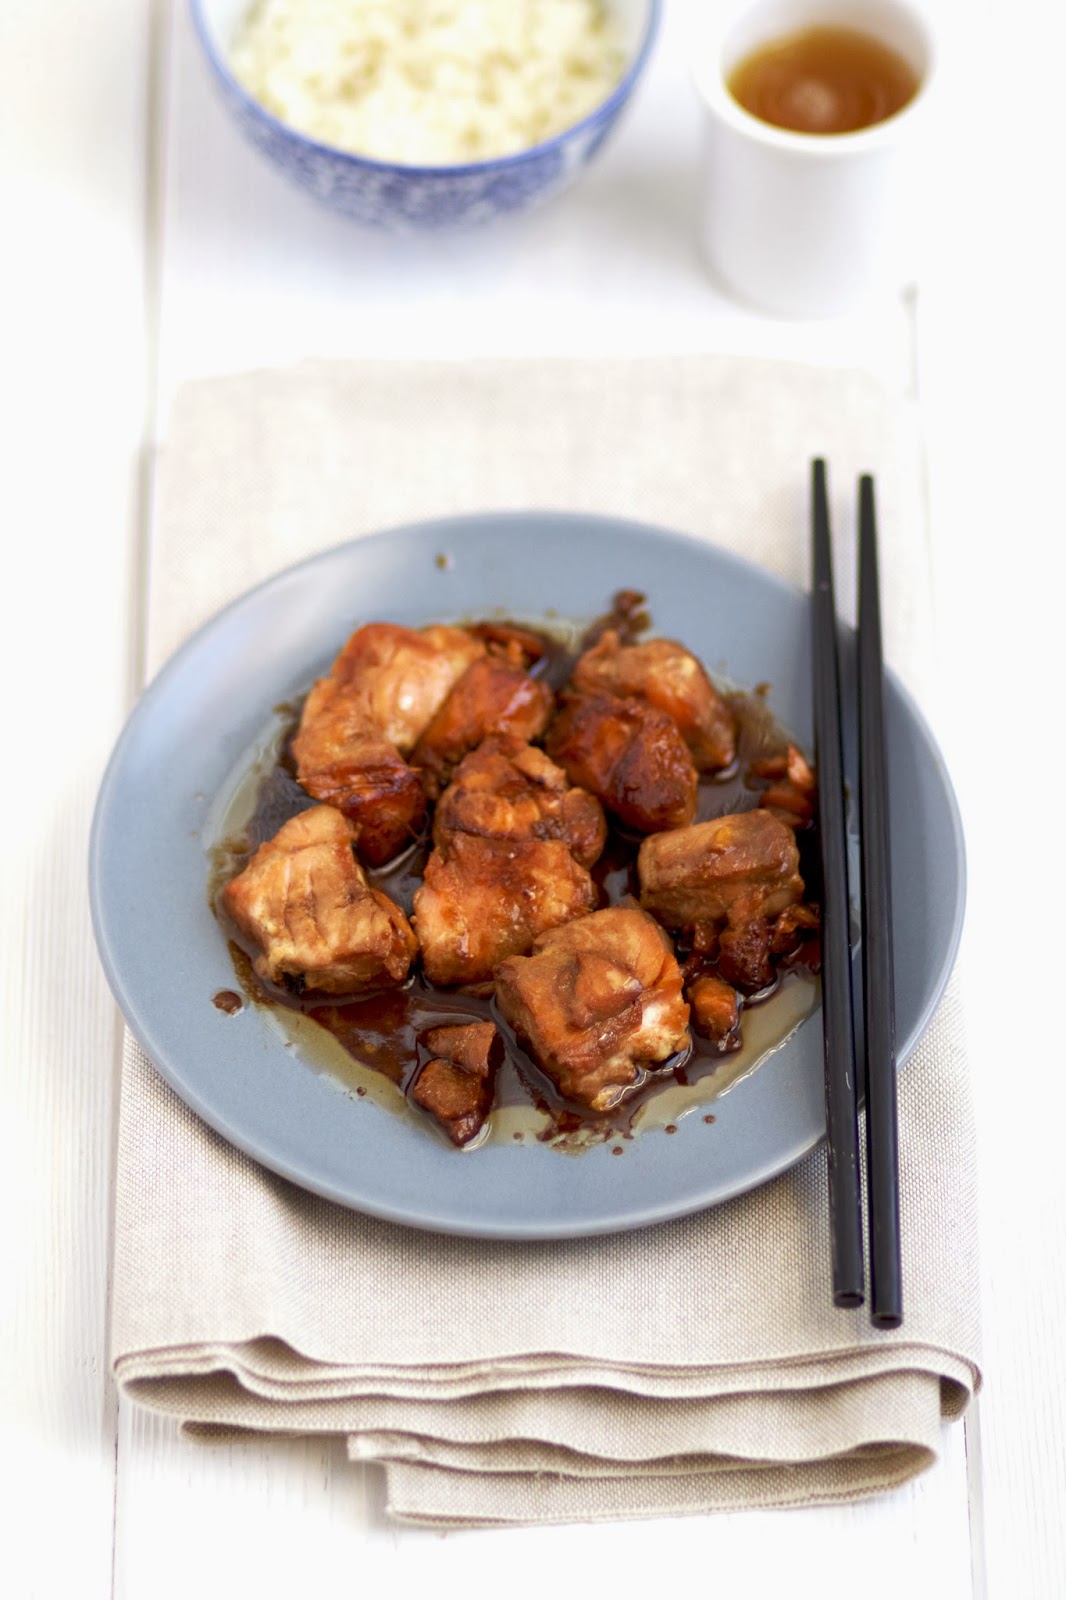
burger con formaggio blu, mele e concasse' di pomodori (versione carnivora): è un cheeseburger, rivisitato in una chiave gourmand. La carne dal sapore indubbiamente strong (già di suo), il formaggio erborinato che si scioglie (non mettetene troppo, altrimenti copre senza pietà i restanti ingredienti :)) , il dolce della mela che smorza il sapido del resto, l'immancabile insalata e i pomodori, in concassè. Una piccola bomba di sapori.
Per i tipi ( o le tipe) tosti/e, che non si lasciano spaventare dalle esplosioni di gusto.  :D

Burger della mucca felice(chiamatelo, se vi piace di più, vegetariano): è la versione vegetale dell'hamburger classico. Solo legumi (nel burger) e verdure, tanto sapore (i burger vegetali sono molto aromatici, richiamano i falafel libanesi) e, fatta eccezione per il pane, poche calorie. Ecco come piace a me: lattuga, cappuccio rosso e bianco, pomodori, cipolla rossa e immancabile ketchup bio oppure homemade (e io qui sgarro! :P). Una piccola bomba vegetariana, certamente più leggera, ma non per questo meno gustosa. A prescindere dalle proprie scelte alimentari, è un'ottima soluzione da alternare alla versione di carne.

Due idee ultra deliziose, sane (il fatto che siano fatte a casa non significa che non siano caloriche, ci tengo a specificarlo) e divertenti. Non occorre dirlo, queste sono solamente due delle possibili versioni che potete preparare; mantenendo la base, potete sbizzarrirvi e creare nuove combinazioni e abbinamenti da inserire nel vostro panino.

Perfetti per una serata film tra amici, con il vostro contorno preferito. :)

Una sola cosa, a prescindere da quale delle due possibilità sceglierete, non potrà mancare: una buona e fresca birra.
Per me belga, doppio malto.

Ok, adesso sì che si siamo! ;)

Burger buns di Katie
tratta e modificata da “In cucina con Katie”, Katie Quinn Davies, Guido Tommasi Editore

Ingredienti:
per circa 8-10 panini

200 g di burro, a temperatura ambiente
1 cucchiaio e ½ di zucchero
4 uova
300 g di farina bianca, setacciata
300 g di farina manitoba, setacciata
42 g di lievito madre essiccato*
1 cucchiaino di sale fino
250 ml di latte intero, leggermente scaldato
una manciata di semi di sesamo

Sbattere in una ciotola il burro con lo zucchero a crema ed unire tre uova, una per volta. Aggiungere gli elementi secchi, quindi farina, lievito e sale e amalgamare con cura. Praticare un buco al centro della “fontana” e versare il latte. Iniziare ad impastare, fino ad ottenere un corpo appiccicoso ma consistente (l'operazione, ovviamente, può essere fatta con un'impastatrice o planetaria). Senza aggiungere altra farina, coprire con uno strofinaccio umido e lasciar lievitare in un luogo caldo per almeno 2-3 ore.

Dopo la prima lievitazione re-impastate delicatamente la pasta su una spianatoia ben infarinata. Lavorare l'impasto per qualche minuto e dividerlo poi in 8-10 palline (o più se volete panini più piccoli) e posizionarle su teglie rivestite di carta forno e leggermente infarinate. Ricoprire con uno strofinaccio umido e lasciar lievitare ancora un'oretta, sempre in un luogo caldo.

Nel frattempo scaldare il forno a 180° e mescolate in una ciotola l'uovo rimasto con un cucchiaio di latte.

Spennellare abbondantemente i panini con questo composto e cospargere un po' di semi di sesamo.
Cuocere in forno per circa 30 minuti, fino a che sono cotti e dorati.

Note:
  • * il prodotto che utilizzo io va utilizzato in percentuale 7% sul totale della farina (quindi nel nostro caso 42 g). Katie invece consiglia di utilizzare ½ cucchiaino di lievito secco.
  • anche se non si dovrebbe fare (io sono la prima restia nel congelare le pietanze) se pensate di non utilizzare tutti i panini o volete averli pronti all'uso (effettivamente non c'è sempre il tempo di preparali freschi), congelateli avvolti in pellicola. Perdono leggermente la loro consistenza ma rimangono comunque ottimi. Piuttosto che cedere a quelli confezionati (mai!) potete restare tranquilli.
    In qualsiasi caso si mantengono, sempre in pellicola, per 2-3 giorni.


Burger di manzo con formaggio blu, mele e concasse'di pomodori
il burger è ispirato da Katie (vedi sopra), i condimenti ispirati da Jamie Magazine, gennaio 2014

Ingredienti:
per il burger di manzo (circa 6-8):

700 g di macinato fresco di manzo
2 cipollotti, tritati
1 cucchiaio di senape all'antica
1 cucchiaio di tabasco
1 cucchiaio di aceto balsamico
1 peperoncino rosso, senza semi e sminuzzato
1 cucchiaino scarso di peperoncino in polvere
un mazzetto di prezzemolo, lavato e tritato
olio evo
sale
pepe

per il condimento:

formaggio blu, erborinato (io della Val Sarentino)
qualche foglia di insalata gentile (o la classica lattuga, se preferite), sciacquata ed asciugata
1-2 mele (io pink lady), senza torsolo e tagliate a fette laterali
senape all'antica
6-8 panini da hamburger

per la concassé di pomodori:
4-5 pomodori (il tipo che preferite), lavati
olio evo
sale

Far appassire i cipollotti con un filo d'olio in una padella antiaderente e mettere da parte. In una ciotola capiente mescolare la carne con la senape, il tabasco e l'aceto balsamico, i due tipi di peperoncino, il prezzemolo, un cucchiaino di sale ( assaggiare per gestire la dose, aggiungere eventualmente). Amalgamare con le mani e unire i cipollotti appassiti, impastare. Assaggiare e aggiustare se necessario. Formare i burger della dimensione che preferite (considerando che in cottura si restringeranno leggermente) e lasciarli riposare in un luogo fresco per almeno due ore.

Per la concassé tagliare a dadini i pomodori, condirli con un filo d'olio e del sale. Lasciare da parte.

Quando siete pronti per iniziare a comporre i vostri panini (tutti gli ingredienti devono essere pronti), cuocere i burger con un filo d'olio in una padella antiaderente, in una bistecchiera o alla griglia, uniformemente su entrambi i lati.

Tagliare a metà i panini, riscaldarli leggermente e formare i burger. Prendere la base del panino, spennellarla con poca senape, impilare in ordine insalata, qualche fettina di mela, la carne, qualche pezzetto di formaggio e un po' di concassè. Chiudere con l'altra metà del panino. Servire caldo.


Burger della mucca felice (burger vegetariano)
tratto e modificato da “Le mie ricette da 15 minuti”, Jamie Oliver, TEA

Ingredienti:

per i burger vegetariani (circa 6-8):

1 mazzetto di prezzemolo fresco, lavato e tritato
200 g di fagioli bianchi, precotti e sgocciolati
200 g di lenticchie, precotte e sgocciolate
200 g di fave, precotte e sgocciolate
½ cucchiaino di pepe di Cayenna
½ cucchiaino di coriandolo in polvere
½ cucchiaino di cumino in polvere
la scorza di un limone bio, grattugiata
2 cucchiai di farina bianca
olio evo
sale
pepe

per il condimento:
qualche foglia di lattuga, lavata e asciugata
cavolo rosso e bianco, lavati e tagliati a julienne
qualche anello di cipolla rossa fresca
pomodori (io perino), lavati e a fette
ketchup bio o homemade (obbligatorio :P)
6-8 panini da hamburger

Preparare i burger mettendo in un mixer da cucina i tre tipi di legume, il prezzemolo, un pizzico di sale (aggiustare successivamente se necessario), pepe macinato al momento, il pepe di Cayenna, il coriandolo, il cumino, la scorza di limone e la farina. Azionare, fino ad ottenere una purea molto spessa e consistente.

Trasferire il composto su un piano di lavoro generosamente infarinato e lavorare. Ricavare 6-8 palline, appiattirle e formare i burger. Posizionarli su un piatto infarinato.

Preparare gli altri ingredienti e quando tutto è pronto cuocere i burger in una padella leggermente unta d'olio, fino a che entrambi i lati sono ben dorati.

Comporre i panini, tagliando a metà il pane e riscaldandolo leggermente. Spalmare del ketchup su una base di panino, impilare la lattuga, il burger, i due tipi di cavolo, la cipolla e le fette di pomodoro, spennellare con un po' di ketchup anche l'altra parte di panino e chiudere.
Servire caldo.

Note:
  • potete utilizzare i legumi che preferite, creando il vostro mix preferito. L'importante è mantenere una dose complessiva di 600 g. Gestiteveli voi ;)!


English version


I'm not a junk food type.
After couple (moreover the unique ones) attempts when I was 10 by “McEverything” (I remeber that going to the city and eating in a fast-food was the coolest sunday pastime for families when I was a little girl, but frankly I still don't understand the utility and above all the uncertain appeal of it), I deserted for long any dish lookingalike junk food.

The fake and flat flavour (mostly gummy) of packaged food has always made me nerve-racking. I hated (I still do) that every single bite (from the potato fries to the burger bun) had the same aroma. The confused and hardly decipherable taste, half way among a plastic bag and a piece of carton, made the lack of hamburgers, fries, nuggets & co. possible from the menus of my outside-home meals. Or better, from then on, they have always been dishes I choose just in trusly places that I really knew.
I turned a blind eye with fries, have to say it, but for the rest I really can say they were flavors I avoided and almost forgot.

I guess I don't eat a nugget since at least six years (to be honest, I don't miss them so much), but it wasn't the same with hamburgers. Sometimes I gave in to my butcher of trust's burger and I ate it in a simple milk roll ('cause I really can't stand those packeged with that sweetish and exipired-simulating taste, don't know if I got the idea across ;)) or to that one from my historic stall (even if, honestly, it can't be named hamburger for real).

A while ago (I'd say finally), after one of the long chats about beer and food with her (by the way an extreme expert of homemade burgers :P) I decided to try doing it homemade.
Yes sir. From soup (the real burger bun) to the nuts (the burger itself, starting by the fresh meat mince and adding some simple falvors to make it special).

And after a long time, I can say I ate a real burger again. With its bun, its seasonigs (rigorously superfresh) and meat of quality.
The recipes for the buns and the meat burger are taken and adapted by Katie, instead the stuffing (in both versions, veg or not) is inspired by Jamie (with my usual changes :)).

Blue cheese, apples and tomatoes concasse' burger(carnivorous version): it's a cheeseburger, revisited in a gourmand key. The meat has undoubtedly a strong flavor (in and of itself), the melted blue cheese (dont' put too much of it, it will cover other ingredients merciless :P), the sweetness of apple muffles the sapid of the rest, the inevitable salad and concassé tomatoes. A small bomb of savors.
For tough types, who don't get scared about taste explosions. :D

happy cow burger(call it veggie if you prefer): it's the vegetable version of the classic hamburger. Only legumes (in the burger) and vegatables, lots of savor (the burgers are really zesty, recalling Lebanese falafels) and, except for the bun, few calories. This is how I like it with: lettuce, red and white coleslaw, tomatoes, red onion and the essential bio or homemade ketchup (I confess, I buy it by the bio-market :P). A small veggie bomb, lighter for sure, but anyway terribly yummy. Regardless of your dietary choice, it's a great solution to alternate with the meat version.


Two ultrafantastic, healthy (the fact they are homemade doesn't mean they're without calories, is that clear) and funny ideas.

These are obviously just two of the possible kinds of burger you can prepare; with the same base you can indulge and create new combinations for your bun.

They're perfect for movie nights with friends, served with your favourite side dish. :)

Just one thing you don't have to miss, aside from your veg or not choice: a great and fresh beer.
For me a Belgian double.

Allright, now we're getting there! ;)

Katie's burger buns
adapted from “What Katie ate”, Katie Quinn Davies

Ingredients:
makes 8-10 buns

200 g butter, soften
1 ½ tbsp sugar
4 eggs
300 g plain flour, sifted
300 g manitoba flour, sifted
42 g dehydrated mother yeast* (yeast base/starter)
1 tsp fine salt
250 ml whole milk, lighlty warmed
a handful of sesame seeds

In a large bowl beat the butter with sugar, until you get a soft and light cream. Then add three eggs, one at time. Mix dry ingredients, so flour, mother yeast and salt and combine well with the butter-eggs mixture. Make a hole in the middle of the “fountain” and pour the milk. Knead with care until you obtain a sticky but compact dough (you can for sure use a kneader or a planetary mixer). Without adding further flour, cover with a damp dishcloth and let rise in a warm place for at least 2-3 hours.

After the first rising, knead the dough again, lighlty, on a well flour-dusted board. Work it for a few minutes and divide it into 8-10 small balls (or more if you want mini buns) and put them on a tray covered with greaseproof paper and some flour. Cover with a damp dishcloth and let rise for an other hour, always in a warm place.

In the meantime heat the oven to 180° and mix in a small bowl the left egg with a tablespoon of milk.

Brush well the top of the rolls with the egg-milk liquid and sprinkle with sesame seeds.
Bake for 30 minutes, more ore less, until they're cooked and golden.

Notes:
  • * The product I used for has to be added in percent 7% over the total of the flour ( in our case 42 g). Katie suggests to use ½ teaspoon of yeast.
  • If you realize that the buns are too much or you want to have them ready for use (I know there isn't always the time for baking them fresh) you can freeze them bound in plastic wrap. I'm the first disliking frozen food, they surely lose a bit their consistency, but you know, I think it's anyway a thousandfold better than a packaged one (never ever!). Anyway they keep, always in plastic wrap, for 2-3 days.


Blue cheese,apples and tomatoes concasse'beef burger
The burger's inspired from Katie (see above), the seasonings are inspired from Jamie Magazine, Jauary 2014

Ingredients:
for burgers (makes 6-8):

700g fresh beef mince
2 spring onions, chopped
1 tbsp mustard
1 tbsp tabasco
1 tbsp balsamic vinegar
1 red pepper, without seeds and chopped
1 scanty tsp ground hot pepper
1 small bunch of parsley, washed and chopped
evo oil
salt
pepper

for the seasoning:

blue cheese (for me coming from Sarentino Valley, Alto Adige-Südtirol, Italy)
some leaves of green salad (or lettuce, if you like it more), washed and dried
1-3 apples (for me Pink Lady), without core and cut in lateral sides
mustard
6-8 burger buns

for tomatoes concassé:

4-5 tomatoes (the type you prefer), washed
evo oil
salt

Sweat spring onions with a bit of oil in a small pan, and leave aside. In a large bowl mix the meat with mustard, tabasco and balsamic vinegar, the two types of pepper, parsley, a teaspoon of salt (taste and regulate, add if necessary). Amalgamate with hands and add the cooked spring onions, knead. Taste again and fix the savor, always if it's necessary. Shape the burgers with the size you prefer (consider that during the cooking the meat will shrink a bit) and let rest in a fresh place for at least 2 hours.


For the concassé cut tomatoes into small cubes, season with a drizzle of oil and a pinch of salt. Leave aside.

When you're ready to start composing your burgers (each ingredient should be ready to use), cook the burgers with a bit of oil in a frying pan, in a gridiron or over a hot barbecue, equally for both sides.

Cut in halves the buns, warm them a bit and form the burger. Start brushing a light layer of mustard on a base of the roll, go on with salad, some wedges of apples, the meat, some pieces of cheese and a bit of concassè. Close with the other half and serve hot.

Happy cow burger (veggie burger)
adapted from “Jamie's 15 minutes meals”, Jamie Oliver

Ingredients:

for veggie burgers (makes 6-8):

1 small bunch of parsley, washed and chopped
200 g white beans, precooked and drained
200 g lentils, precooked and drained
200 g broad beans, precooked and drained
½ tsp Cayenne pepper
½ tsp groung coriander
½ tsp ground cumin
zest of a bio lemon, grated
2 tbsp flour
evo oil
salt
pepper

for the seasonig:

some leaves of lettuce, washed and dried
red and white coleslaw, washed and cut into julienne strips
some rings of fresh red onion
tomatoes (for me perino type), washed and sliced
bio or homemade ketchup (obligatory :P)
6-8 burger buns

Prepare the burgers putting in a food processor/mixer the three legumes, parsley, a pinch of salt (fix later if necessary), freshly ground pepper, Cayenna pepper, coriander, cumin, lemon zest and flour. Whiz until fine and combined.

Move the mixture over a well flour-dusted working board and knead it. Divide into 6-8 pieces, flatten each ball and shape the burgers as a patty. Put them on flour-dusted plate.

Prepare other ingredients and when everything's ready cook the burgers in a lightly oiled frying pan, until they golden.

Make the burgers, cutting in halves the bun and warming it a bit. Brush some ketchup on one base of bread, then heap in order the lettuce, the burger, the two coleslaw, the onion and the tomatoes slices. Brush with further ketchup also the other part of the bun and close. Serve it warm.

Notes:
- you can obviously use your favourite legumes, creating your perfect mix. You just have to keep the total dose of 600 g. The rest is up to you ;)!


Adventskalender

$
0
0

Lo ricordo, quando ero piccina. Il primo di dicembre ha sempre avuto un significato magico per me. Alla mattina presto, ancora sotto le coperte con i piedini avvolti da caldi calzini di lana ed il nasino infreddolito, un'aria diversa circondava l'atmosfera della mia cameretta. Sapevo cosa stava per succedere, cosa stava per iniziare, anche quell'anno. Che quella casellina del mio Adventskalender (calendario d'Avvento) era pronta per essere aperta. Che era il momento.


L'Avvento, il periodo dell'anno che preferisco da sempre, che avvolge dicembre, che lo coccola.

Tra neve, berretti di lana, sciarpone xxl e immancabili guanti. Tra la cioccolata calda e lo stollen di mamma a merenda, Christmas di Bublè di sottofondo (e i Pink, solo per poco riposano ;) ), anche un semplice pomeriggio diviene magico.


L'Avvento è cannella dappertutto in cucina, è San Nicolò in famiglia e abbuffate di Zimtsterne. E' sere trascorse a pensare ai regalini edibili per le Feste, alle confezioni. E' cartoncino, forbici e nastrini . E' decorazioni per la casa, è la candela della Adventskranz (corona d'Avvento) accesa alla sera, il soggiorno caldo, l'albero, i para-orecchi con le renne.


Qui vi avevo già raccontato di come vivo il periodo che precede il Natale, di quanto tempo dedico in cucina, di come vivo intensamente queste lunghe giornate d'inverno/fine autunno.

Nonostante gli impegni, che anno per anno aumentano e si infittiscono, ho sempre ritagliato del tempo per i preparativi. E quest'anno non sarà diverso. Anche se è difficile. Anche se è un periodo strano, dopotutto. Nel quale devo capire ancora tante cose. E forse è meglio così. Perchè se tutto, fuori, è disordine, vortice e anche ( non sempre) sofferenza, io nell'Avvento mi rifugio. Perchè è casa, è famiglia, è sorrisi e abbracci caldi. E' sicurezza ed equilibrio. E' tornare. Adesso ne ho bisogno.


E allora, oggi, come ogni anno, come ogni primo di dicembre, ecco che ho aperto la mia casellina del calendario (con motivi rigorosamente tedeschi :)). Proprio come quando avevo le manine troppo piccole per staccare le porticine. Perchè per alcune cose, non si è mai troppo grandi.


Quest'anno ho voluto esagerare. Eh sì. Perchè se a casa mia i calendari erano più di uno (quello mio, di mia sorella, quello decorativo e quello della famiglia, sì, roba da pazzi ;) ), non ne ho mai abbastanza. Ci pensavo da un po', e alla fine mi sono decisa: ho ricreato un calendario d'Avvento edibile, in stile nordico-germanico. Un'idea semplice, così pulita. Così facile da fare. Così bella. Tra le altre cose uno splendido elemento decorativo :)


Una scaletta di legno, nastrino a righe rosse e bianche, 25 biscottoni tipo pepparkakor(con una ricetta speciale, super particolare) glassati, mele rosse e aghi di pino argentato. 


Basta poco. Per volare in un'atmosfera surreale. Che sa di Nord, di neve, di zenzero e chiodi di garofano. Di casette di legno e camini accesi. Che sa di ricordi ed emozioni che non muoiono mai. Che a prescindere da tutto rimarranno sempre le stesse.


Oggi è così. E, sì ci riesco ancora, sorrido. Perchè non posso proprio fare altro ;)


Ps. Il tempo è poco, pochissimo, l'ho già detto. Ma non mancherà niente, ve lo prometto. Ci saranno idee, nuove. E ovviamente regalini home-made commestibili per Natale. :)


Non sparite, mi raccomando. Ne varrà la pena. :)


Biscotti speziati con melassa (tipo pepparkakor)

tratta e modificata da Sale e Pepe Kids, dicembre 2012


Ingredienti:

per 20-30 biscotti (di forma media):


450 g di farina bianca, setacciata (più quella per la lavorazione)

2 cucchiaini e ½ di zenzero in polvere

1 pizzico di noce moscata in polvere

1 pizzico di chiodi di garofano in polvere

1 pizzico di cannella in polvere (facoltativa)

1 cucchiaino di bicarbonato di sodio

90 g di burro morbido

110 g di zucchero di canna integrale (tipo muscovado)

2 uova

180 ml di melassa (oppure 90 ml di melassa e 90 ml di sciroppo d'agave)

zucchero a velo

½ cucchiaino di sale


per la glassa:

250 g di zucchero a velo, setacciato

4-5 cucchiai di acqua a temperatura ambiente

qualche goccia di succo di limone (facoltativa)


Tagliare il burro a pezzetti e lavorarlo con lo zucchero di canna in una ciotola, sbattendo con una frusta, fino a che raggiunge una consistenza cremosa ed omogenea. Aggiungere le uova, uno alla volta, versare la melassa (o il suo sostituto) e continuare a montare. In un'altra ciotola mescolare la farina, le spezie, il bicarbonato ed il sale. Aggiungere gli ingredienti secchi alle uova e amalgamare bene, impastare fino ad ottenere un pallina liscia.

Coprire l'impasto e lasciar riposare in frigo per almeno 3 ore. Togliere l'impasto dal fresco una mezzora prima di lavorarlo, facendolo riposare a temperatura ambiente. Dividere l'impasto in due, stendere le sfoglie con uno spessore di mezzo cm e ricavare i biscotti, con forme natalizie a piacere. Dovendo appendere i biscotti, praticare dei forellini (io con la punta di un sac a poche) per far poi passare il nastro.

Adagiare i biscotti sulle teglie da forno rivestite da carta oleata e cuocerli in forno già caldo a 180° per 7-8 minuti, prestando attenzione affinché non risultino troppo dorati.

Sfornarli, farli raffreddare. Glassarli, scrivendo su ogni biscotto il numero (da 1 a 25) con l'aiuto di un sac a poche e decorarli a piacere. Far asciugare la glassa per una notte al fresco. Il giorno seguente, infilare in ogni biscotto un pezzetto di nastro decorato, chiudendo con un fiocchetto. Appendere i biscotti sul “calendario”.


Note (anche creative :) ):

·         potete utilizzare qualsiasi superficie per creare il calendario. Io ho proposto una scaletta di legno, ma si possono tranquillamente appendere i biscotti su un ramo di un albero (anche sbiancato, per un gusto ancora più nordico), su un asse di legno grezzo con puntine rosse e bianche. Sbizzaritevi, date sfogo alla vostra fantasia, e se avrete voglia, condividete con me la vostra idea :)

·         la dose di glassa è molto abbondante. Potete lasciare i biscotti semplici come ho fatto io ( con il solo numero al centro), oppure potete aggiungere puntini, linee o altro a vostro piacere.

·         Questi biscotti si conservano a lungo in contenitori ermetici ben sigillati. Inoltre sono perfetti per arricchire i vostri pacchetto regalo. Legate un biscotto decorato (potete inserirlo in un sacchettino trasparente o di juta per un risultato più rustico) al nastro del vostro pacchetto assieme al biglietto-etichetta. Sarà una dolce sorpresa per la persona che aprirà il dono :)


...you never know what you're gonna get. :)

$
0
0


Mama said life is like a box of chocolates. You never know what you're gonna get.”

Mamma diceva che la vita è come una scatola di cioccolatini. Non sai mai quello che ti capita.”
Forrest Gump

Ho imparato a farmi sorprendere dalla vita. Fino a poco tempo fa credevo fosse solo questione di programmi. Organizzazione e metodo. Una sorta di scaletta, a punti.

Ho trascorso gran parte del mio tempo a scriverla, a costruirla. Spesso credo anche di aver perso alcune occasioni, alcuni momenti. La mia concentrazione e devozione al programma erano esagerate. Così doveva andare, così dovevo fare. Non si discuteva.

Con il tempo- ce n'è voluto- ho capito molte cose.
Ho aperto gli occhi, o meglio, ho tolto il paraocchi. Ero stata rinchiusa in una rigidità assurda. Quel senso di dovere che mi ero auto-imposta. Una prigione, nella quale vigeva la Perfezione. Le Certezze erano i pilastri della struttura. E poi c'era lei, la Sicurezza, che mi sussurrava che finchè sarei rimasta tra quei limiti, non avrei potuto sbagliare. Non mi sarei mai persa.

Il paraocchi, sì. Quello che non mi faceva vedere bene la mia realtà. Le altre, di strade. Proprio quelle. Con una moltitudine di curve, deviazioni. Tante salite e le rispettive discese. Qualche buca e qualche sassolino, nel mezzo. Le piazzole, dove fermarsi e riprendere fiato. Tutti, prima o poi, ne hanno bisogno.

Sicuramente erano meno chiare di quell'autostrada infinita, perfettamente asfaltata ed illuminata.
Ma valeva la pena conoscerle, quelle stradine sterrate.


Un giorno, senza che me n'accorgessi, ho intravisto una nuova Me. Vedevo le cose in maniera diversa. Anche quelle che già conoscevo. Mi sono vista. Davvero.
Spaventata, elettrizzata e confusa hosentito la trasformazione. Scegliendo quel cioccolatino dalla mia scatola (e probabilmente avrei scelto quello comunque, in un'altra vita o in un altro modo), ho trovato tutt'altro. Sono atterrata su un terreno che avevo sempre considerato fragile, instabile. Ero svestita. Non avevo più certezze con cui proteggermi. La versione chiara e intatta (impeccabile) del mio mondo era scomparsa. Ci sono rimasta per un po', a respirare. Ho iniziato a scoprire una nuova aria. Ero curiosa di ascoltarla, di ascoltarmi. Volevo vedere dove mi avrebbe condotta.
Mi ero svelata, il passato ormai non avrebbe più potuto (anche volendo) essere ristabilito.

Ero salita su quel bus, quello che in realtà avevo sempre aspettato.
Quello che non avevo mai avuto il coraggio di prendere.


Della ricetta oggi nominerò solo i tratti principali. Proviene da uno dei miei libri di food preferiti, è la mia versione prediletta delle polpette. Un piatto ricco dai sapori freschi che si intersecano con quelli più decisi ed aromatici. Il retrogusto delle spezie barahat* (homemade, per me), il carattere della carne d'agnello, le erbe aromatiche fresche e il contorno di fave che smorza i sapori delle polpette.
Un piccolo viaggio, in terre così lontane.

Anche se io, ve lo confesso, le ho mangiate in Tennessee.

In quel famoso fienile. ;)


Polpette di Gerusalemme con fave
tratta e modificata da “Jerusalem”, Yotam Ottolenghi e Sami Tamini, Bompiani

Ingredienti:

per le polpette:

300 g di manzo macinato
150 g di agnello macinato
metà cipolla rossa, tritata
1 scalogno (oppure 2 cipollotti), tritato
120 g di pangrattato
una manciata di erbe aromatiche fresche, tritate (io menta, aneto, coriandolo) + per decorare
1 cucchiaio scarso di misto spezie baharat*
2 cucchiaini di capperi, sminuzzati
1 uovo, leggermente sbattuto
sale
pepe
olio evo

per il misto spezie baharat* (a modo mio):

1 cucchiaino di semi di coriandolo
1 macinata abbondante di pepe
1 pizzico di cannella in polvere
1 pizzico di chiodi di garofano in polvere
1 pizzico di pepe di Cayenna o peperoncino classico (facoltativo)
2 cucchiaini di semi di cumino
½ cucchiaino di cardamomo in polvere
1 pizzico di noce moscata grattugiata

per il contorno di fave:

400 g circa di fave, precotte
qualche rametto di timo
3-4 cipollotti, tagliati a rondelle
la scorzetta di un lime
il succo di metà lime
sale
pepe
olio evo


Per il baharat, pestare in un mortaio il cumino ed il coriandolo fino a renderli una polvere sottile (se avete un macinaspezie sarete più agevolati) e aggiungere poi le altre spezie in polvere e mescolare.

Per le polpette, mescolare in una ciotola capiente le due carni, la cipolla con lo scalogno (o i cipollotti), le erbe aromatiche, il baharat, i capperi e l'uovo. Aggiungere una macinata di pepe e un leggero pizzico di sale. Impastare con le mani tutti gli ingredienti fino ad ottenere un composto ben omogeneo. Assaggiare e aggiustare di sale se necessario (prestate attenzione a non esagerare, anche se la carne sembra leggermente insipida in cottura il gusto cambierà).

Ricavare le polpette della dimensione di palline da ping pong. Scaldare una padella antiaderente con un filo d'olio e cuocerle a fuoco medio, metà della dose totale per volta. Farle rosolare fino a che risultano dorate e procedere con le altre.
Mettere da parte le polpette.

Nella stessa padella, far rosolare i cipollotti con dell'olio, affinchè si ammorbidiscano. Aggiungere poi le fave e mescolare. Insaporire con il timo e la scorzetta di lime, sfumare con il succo di lime, salare e pepare. Lasciar cuocere per 7-10 minuti.

Alla fine, unire le polpette alle fave e, a fiamma bassa, mescolarle insieme.
Servire calde.

Note:
  • potete servire le polpette con del riso bianco (basmati) o altro contorno a vostro piacere. Io credo che comunque le fave possano già essere considerate un contorno ricco e sostanzioso, quindi possano bastare come accompagnamento.
  • Se non apprezzate la carne di agnello, potete aggiungere il peso della carne sostituendolo con la pasta di salsiccia. In questo caso state molto attenti al condimento. È probabile non sarà nemmeno necessario salare.


    English version:


    Mama said life is like a box of chocolates. You never know what you're gonna get.”

    Forrest Gump

    I learned to be surprised by life. Until a while ago I thought it was just a matter of programs. Organisation and method. Kind of point by point schedule.

    I passed most of my time writing and building it. I often guess I lost some occasions and moments 'cause of it. My concentration and devotion were exagerated and only focused on the plan. So it had to go, so I had to do. It was really indisputable.

    I grew up and with some time – I needed lot of it- I understood many things.
    I opened my eyes, or better, I took off (I'd say I threw away) the blinkers. I've been closed in a absurd rigidity. That strong and damned sense of duty that I imposed to myself. A prison, where Perfection ruled. Certainties were the pillars. And then She, Security, always whispered me I wouldn't have been lost or failed until I've been ramained among the limits.

    Blinkers, yes. That thing impeding me to watch my reality. The other paths. Precisely them. With lots of turns, deviations. Many rises and the respective slopes. Some holes and some small stones in the middle. The lay-bys where to stop and breathe again. Everyone, sooner or later, need to do it.

    They were surely less clear than that unlimited highway, perfectly paved and well-lighted.
    But it was worth to know those dug up paths.

    I failed to notice that one day, I saw a new Me. I was watching things in a so different way. Even those ones I already knew. I saw myself. For real.
    I was frightened, thrilled and confused at the same time but I immediately felt the transformation. I found quite another thing, choosing that specifical chocolate (and probably I would have chosen that one anyway, in one way or an other).
    I landed on a fragile and unstable soil. I was undressed. I didn't have certainties with which protect myself anymore. The clear and intact (mostly flawless) version of my world disappeared. I stood a while, breathing. I started to discover a new air. I was tremendously curious to listen to it, to listen to myself. I wanted to see where it would have brought me.
    I was unveiled, and the past couldn't have been restored no more.

    I got that bus, that one I've been always wainting for, actually.
    That one I didn't find the courage to get.


    I will just mention some lines of the recipe. It comes from one of my fav cooking books, it's my cherished version for eating meatballs. A rich dish with fresh flavors crossing with those stronger and more spiced ones. The aftertaste of barahat* spices (for me homemade), the character of lamb meat, the aromatic herbs and the side dish made by broad beans, muffles the tastes of meatballs.

    A small trip, in far away countries.

    Even if, I confess it, I ate them in Tennessee.

    In that famous barn. ;)


    Jerusalem's meatballs with broad beans
    adapted from “Jerusalem”, Yotam Ottolenghi and Sami Tamini, Bompiani

    Ingredients:

    for the meatballs:

    300 g beef minced
    150 g lamb minced
    one half red onion, chopped
    1 shallot (or 2 spring onions), chopped
    120 g bread crumbs
    a handfull of fresh aromatic herbs, finely chopped (for me mint, dill, coriander) + for garnishing
    1 tbsp barahat* spices mix
    2 tsp capers, chopped
    1 egg, lightly beaten
    salt
    pepper
    evo oil

    for barahat* spices mix:

    freshly ground pepper
    1 tsp coriander seeds
    1 pinch ground cinnamon
    1 pinch ground cloves
    1 pinch Cayenna pepper or classic ground hot pepper (optional)
    2 tsp cumin seeds
    ½ tsp ground cardamom
    1 pinch grated nutmeg

    for the broad beans:

    400 g broad beans, precooked
    some branches of fresh thyme
    3-4 spring onions, cut into rounds
    lime zest
    the juice of one half lime
    salt
    pepper
    evo oil

    For barahat, crush into a mortar the cumin and the coriander til you get a thin powder (if you own a spices mill the work will be so easy). Add then all the other spices, mix them all together.

    For the meatballs, mix in a large bowl the two types of meat, the onion with the shallot (or spring onions), the aromatic herbs, the barahat, the capers and the egg. Add some ground pepper and a small pinch of salt. Work with hands all ingredients until you have a homogeneous mixture. Taste and fix with salt if necessary (be careful not to exaggerate, even if meat seems to be insipid, the flavor will change during the cooking).

    Shape the meatballs with the size of a ping pong ball. Heat a frying pan with a drizzle of oil and cook them at a medium flame, half of the total at time. Sear them until they golden and go on with the rest of them.
    Left aside the meatballs.

    In the same pan, brown the spring onions, so as they get soft. Add then the broad beans and mix. Season with thyme and lime zest, simmer with the juice, salt and pepper. Let cook fo 7-10 minutes.

    At the end, add the meatballs to the broad beans and mix together, on a very light flame.
    Serve hot.

     
    Notes:

  • you can serve the meatballs with white rice (such as basmati) or an other side dish you like. I personally think that broad beans are a rich and nutritious side dish by itself, so they can be enough.
  • If you don't like lamb meat you can substitute the same dose of meat with “sausages paste” (the inside part of sausages). In this case take care with the seasoning. It's probably you won't need to add other salt in it.


Candy cane chocolate cookies. And Happy New Year :)

$
0
0


Perchè non è tempo di chiacchiere e pensieri.
Sono sempre stati tanti, alcuni dovuti. Non posso dimenticarli, far finta che nulla stia accadendo. Fingere e negare la realtà.

And I've got a strong urge to fly.
But I got nowhere to fly to.”

Nobody home, Pink Floyd, The Wall (film)

Credo di averla già scritta, questa frase.
Solo che questa volta scappare non è la soluzione. Anche se lo sento, come forte desiderio, non è fuggendo che le cose si sistemeranno. Fa più male, rimanere. Rivedere i posti, le persone e le abitudini. Ma devo farlo. Devo risolvere, devo sistemare. Staccare è lecito, necessario. Però devo capire, per me. 


Il periodo natalizio è terminato, molte cose stanno finendo, come è giusto sia. Lo avevo già anticipato su Facebook che non sarei stata propriamente coerente proponendo voi questa ricetta, forse sicuramente più indicata al periodo precedente al Natale. Questi candy cane chocolate cookies ricordano e riprendono evidentemente i biscotti da consumare alla sera durante l'Avvento, con un bicchierone di latte accanto. Avete presente i biscottoni da divorare davanti alla tv, mentre state guardando il classico film di Natale, avvolti da una calda coperta? Ecco, quella è l'idea che questi dolcetti volevano rendere. Quella che avrei voluto rendere io, per lo meno. Per una serie di motivi non è stato possibile e così, essendo tutto strano, tutto al contrario, tutto confuso, questi cookies, da me sono arrivati adesso. Quando tutto ormai sta per finire, e cambiare. Quando i film di Natale non hanno più quel significato tanto magico e tremendamente affascinante. Quando forse tutto non ha nemmeno più senso.


Fatto sta che questi biscotti ormai ci sono, simpatici e buffi, golosi e calorici. Quei bastoncini di zucchero rossi e bianchi, che dopo 19 anni ho trovato/ricevuto per la prima volta, dovevano finire da qualche parte. Perchè anche se non lo voglio ammettere, ci tenevo da morire a quei bastoncini. Perchè finalmente anche io, mi sono sentita come una piccola attrice di quei film di Natale, americani. Fiera di quelle caramelle lunghe a forma di bastone che appese all'albero son ancora più belle. E ancora una volta, forse una delle ultime, mi son sentita piccina, spensierata e speranzosa. Ad aspettare il Bello che arriverà, perchè so che succederà.


Non sto dicendo di fare come me, di sconvolgere ogni tendenza e di preparare ora questi biscotti tanto natalizi, trementamente fuori tema. Forse apprezzerete l'idea per l'anno prossimo, forse non vi invoglierà per nulla. Posso solo dirvi che con me hanno funzionato, che forse un po' magici lo sono. Che in parte mi hanno aiutato a trovare quello che quest'anno, anche per colpa mia, mi ero fatta sfuggire. :)

Infine, buon Anno gente. :)
Vi auguro una meravigliosa fine, un magnifico inizio.
All the best, always. :)


C andy cane chocolate cookies
tratta e modificata da Donna Hay

Ingredienti:

110 g di burro, morbido
175 g di zucchero di canna
1 uovo
un pizzico di vaniglia Bourbon in polvere
150 g di farina, setacciata
25 g di cacao amaro, setacciato
½ cucchiaino di bicarbonato di sodio
400 g di cioccolato fondente
4-5 bastoncini di zucchero (la dose dipende a seconda della dimensione delle caramelle)

Lavorare il burro morbido con lo zucchero, usando lo sbattitore o la planetaria, fino ad ottenere un composto cremoso.
Unire l'uovo e continuare a sbattere. In una ciotola mescolare la farina con il cacao, la vaniglia ed il bicarbonato.
Sciogliere 120 g dei 400 di cioccolato a bagnomaria, e tritare a piccoli pezzetti il resto. Quando il cioccolato è completamente sciolto, aggiungerlo al composto burro-uovo e mescolare.
Aggiungere con delicatezza e in più passaggi il mix di ingredienti secchi, continuando a sbattere. Unire per ultimo il cioccolato a pezzetti ed impastare. Formare delle palline di impasto, posarle sulle teglie da forno ricoperte con carta oleata e premere/appiattire i biscotti.
Cuocere i biscotti a 160° gradi per i primi 5-8 minuti, nel frattempo sminuzzare i bastoncini di zucchero.
Quando è trascorso questo tempo, cercando di essere il più rapidi possibile, incastrare nell'impasto semicotto i pezzetti di caramella sulla superficie dei biscotti.
Terminare la cottura per ulteriori 5-8 minuti (la cottura totale dovrebbe essere di circa 12-15 minuti).
Una volta pronti (deve formarsi una leggera crosticina) lasciarli raffreddare completamente.

Note:
  • l'aggiunta dei pezzettini di caramella va fatta a metà cottura poiché con il calore del forno, lo zucchero tenderà a sciogliersi. Se incastrerete i bastoncini fin da subito (prima di inizare la prima parte di cottura), lo zucchero dopo poco si scioglierà e a fine cottura non troverete più l'effetto dei pezzetti chiari, ma anzi piccoli crateri incavati, dall'effetto poco carino.
  • Potete conservare questi biscotti in contenitori ermetici per qualche giorno. Manteranno comunque la loro consistenza.


it's so fluffy I'm gonna dieeee! :)

$
0
0


Oggi voglio lasciarvi poche parole. Ho imparato a capire il valore del silenzio.
Anche se l'ho sempre detto che uno sguardo o uno scatto, a volte, sanno dire molto più di lunghi fiumi di parole (lo dice una che davvero, il dono della sintesi non l'ha ricevuto ;) ).

Un saluto velocissimo, con questa dolcissima torta-agnello, decorata in due versioni. Perfetta per il pic-nic di Pasquetta. :)
Credetemi, la seconda, riuscirebbe quasi a superare l'unicorno di Agnes (cfr. Despicable Me, Cattivissimo Me) ;)

Per il momento vi auguro buona Pasqua e dei bellissimi giorni di primavera.
Tanti fiori, freschi. Uova, raccolte da un pollaio in campagna. Qualche instantanea e un prato verde. Dove sdraiarsi e respirare.
A volte basta solo quello.


Torta agnello al lime di Pasqua

ingredienti:

per la base di torta:

75 g di burro, a temperatura ambiente
75 g di zucchero
2 uova
125 g di farina, setacciata
2 cucchiaini di lievito per dolci bio, setacciato
2 lime, lavati e asciugati

per decorare:

zucchero a velo

oppure

questofrosting (dimezzate le dosi)

In una ciotola lavorare a crema il burro e lo zucchero, incorporare le uova, una per volta. Aggiungere poi la farina e il lievito. Grattugiare la scorzetta dei lime e ricavarne il succo. Aggiungerli poi all'impasto e mescolare con cura. Versare l'impasto in uno stampo a forma di agnello, ben imburrato ed infarinato. Cuocere il dolce a 180° per 20-25 minuti, controllando la cottura con lo stecco. Lasciare raffreddare completamente la torta e poi sformala.
A questo punto decorare con dello zucchero a velo spolverato o procedere preparando il frosting, come qui.


Note:
  • non occorre dire che è necessario possedere uno stampo a forma di agnello, ma potete ovviamente utilizzare la base di dolce e la glassa che preferite.


English version:


Today there are just a few words. I learned to appreciate the worth of silence.
Even if I've always said that sometimes a gaze or a picture tell more than what huge streams of words would do (believe me, it's a long-wided person saying it ;) ).

A quick greeting with this super sweet Easter lamb cake, decorated in two versions. It's perfect for Easter Monday picnic. :)
Trust me, the second one could almost beat Agnes' unicorn (cf. Despicable Me, the movie) ;)

I wish you Happy Easter, for the moment, and some wonderful spring days.

Lots of fresh flowers. Eggs, coming from a country chicken coop. Some snap-shots and a green field.
Where to lie down and breathe.
Sometimes it's really enough.


Easter lamb (simple cake with lime and coconut-creem cheese frosting)

ingredients:

for the cake base:

75 g soft butter
75 g sugar
2 eggs
125 g plain-flour, sifted
2 tsp bio baking powder, sifted
2 limes, washed and dried

to decorate:
icing sugar

or

this frosting (halve the doses)


Mix butter with sugar in a bowl, until you get a light and soft cream. Incorporate the eggs, one at time. Add flour and baking powder. Grate the zest of limes and extract the juice. Add them to the dough and mix carefully. Bake the cake to 180° for 20-25 minutes, but anyway check the cooking with the toothpick. Let the cake completely cool and pull it out from the cake mold.
At this point decorate with dusted icing sugar or go on preparing the frosting, like here.

Note:
  • it goes without saying: you need a specific cake mold (lamb shaped) but you can choose your favourite cake base and the frosting you like most, obviously.


Ode to Spring.

$
0
0


 Avrei molte cose da dirvi.
Tante, forse troppe, sono in ballo.
Mi sembra quasi di non riuscire a seguire questa storia, che poi è la mia.
Respiro l'aria di primavera, una primavera così diversa. Intensa, non c'è dubbio. Piena di qualcosa che nemmeno io so interpretare. Una primavera che mi fa perdere le parole. Che non dimenticherò.
Voglio che significhi rinascita. L'inizio di un nuovo capitolo. 

Questo post sarà un'ode a questa stagione. Pieno di colori, rosa pallido e fiori. Diverso dal solito, oltre ad essere più ricco. Perchè adesso molte cose cambieranno, anche qui. Forse è giunta l'ora che pian piano vi prepari a questa rivoluzione. :) Un passo per volta. Prometto che vi spiegherò tutto, magari in un post ad hoc. Credo lo meritiate.

Ultimamente ho la tendenza (folle?!) di mettere ovunque fiori. Sono circondata da bouquet di garofani, crisantemi e ranuncoli (elenco dei miei preferiti ;)) di ogni genere. Ho trascorso più tempo in fioreria e in serre che in uno negozio di alimentari (quindi, c'è da preoccuparsi! ;) ). Casa ora è invasa di piccoli mazzolini di prato, vasi e composizioni. Mi rallegrano e fanno nascere un sorriso solo guardandoli. A dire la verità non ho mai creduto di possedere il pollice verde. Nonostante abbia sempre aiutato mamma, grande appassionata di giardinaggio, non mi ci ero mai avvicinata più di tanto. Apprezzavo il lavoro dei professionisti e il floral design in generale, però non avevo mai provato a creare un qualcosa di mio. Qualche tempo fa, sfogliando un rivista, mi si è accesa una lampadina. Pochi giorni dopo infatti, ho preso forbici e corona da fiorista e, in un laboratorio alquanto improvvisato, ho creato questa corona di primavera. L'idea mi è nata da un'immagine che avevo in mente da un po'. Un portone di legno vecchio, una maniglia di ferro battuto e questa corona appesa con un nastro bianco. In realtà alla fine è diventata un meraviglioso centrotavola (ma può tranquillamente essere un decoro di un mobile vecchio). È molto ricca e corposa, rischierebbe di cadere se appesa o di rovinare la porta.


Come saprete io impazzisco per lo stile rustico (un po' country-shabby) con il quale sono cresciuta. Ovviamente però potete personalizzarla a seconda del tipo di abitazione e di interno. È adorabile in una casa di campagna, ugualmente bella in un elegante appartamento di città. Anche se continuo a credere che con il legno non abbia rivali. ;)


Bene, la parte di lifestyle che tanto aspettavo l'ho svelata (il tutorial segue, prima della ricetta). Ora però devo parlarvi un po' del dolce. Una soffice angel cake ai lamponi con una glassa allo yogurt. La torta più spugnosa e morbida che io conosca. Leggerissima. Una nuvoletta bianca zuccherina. Il gusto semplice e dolce della base viene arricchito dall'acidulo dei lamponi ed è in contrasto con la glassa allo yogurt. Il dolce perfetto per una merenda di primavera, allestita in giardino, con qualche bandierina rosa chiaro e bianco e una limonata alle fragole.E le cannucce rigorosamente a strisce/pois. Immancabili.

Ingenua e fresca. Forse un po' come me. 


 Mi ricorda l'aria frizzante di queste tiepide giornate, che riempie i polmoni e lo spirito.

Un fiorellino colto in un prato da mettere in una spettinata treccia di capelli. Una camminata in lunghe distese verdi, sdraiarsi e guardare il cielo. Questa, per me, è primavera.

Spero di cuore apprezzerete questo post, almeno la metà di quanto ho fatto io. <3


Corona di primavera


cosa serve:

una corona da fiorista in spugna (da cercare nelle fiorerie o nei negozi specializzati)
misto di “verdi” a vostra scelta (chiedete al vostro fioraio/a di fiducia di consigliarvi)
rami di rosmarino
garofani verdi
crisantemi verdi
margherite
forbice da fiorista

  1. Inumidire la corona in una bacinella d'acqua e lasciarla in ammollo per circa 5-7 minuti, immergendola completamente.
  2. Trasferire la corona su un piano di lavoro coperto da un telo, sgocciolandola leggermente.
  3. Iniziare dai verdi (garofani verdi inclusi). Tagliare con la forbice dei piccoli ciuffetti misti o pezzetti di pianta, pulire l'estremità dello stelo ed inserirli nella spugna, direttamente. Partire dalla metà sinistra della forma, e continuare in senso antiorario (per i mancini è probabile valga il principio opposto). Coprire tutta la forma, cercando di dare simmetria alla corona, alternando le piante, fino a che il risultato è equilibrato.
  4. Continuare con i fiori, ovvero le margherite e i garofanini. Ugualmente tagliare i fiori, pulirli da foglie e liberare lo stelo. Inserirli tra i verdi, sempre partendo da una metà e continuando in senso antiorario.
  5. Controllare che non ci siano buchetti di spugna ed eventualmente coprirli con altro verde.

Note:

  • La scelta dei fiori e delle piante è assolutamente personale. Dipende dai vostri gusti, dalla dispobilità, dalla resa che volete abbia e dall'occasione. Fatevi consigliare dal vostro fioraio/a di fiducia.
  • La corona è adatta a diventare un centrotavola, più che per essere appesa ad un portone. Infatti, anche se la corona di spugna ha una base apposita impermeabile, soprattutto se si ha una porta in legno il rischio di inumidire la porta è alto. Inoltre è anche molto pesante, bisognerebbe fissare il nastro con chiodi e martello, rovinando così la porta.
  • La durata dei fiori varia in base alla scelta compiuta. In media è di circa 3-4 giorni. Il mio consiglio è di spruzzare con acqua la corona tutti i giorni (eccetto il giorno in cui l'avete preparata) in modo da tenere leggermente umida la spugna. Inoltre se i verdi sono più resistenti mentre i fiori freschi appassiscono, sostituite questi ultimi con altri, così da utilizzarla il più a lungo possibile.


Angel cake con lamponi e frosting allo yogurt

Ingredienti:

per la angel cake:

65 g di farina, setacciata
1 pizzico di sale
6 bianchi d'uovo
1 cucchiaino abbondante di cremor tartaro
150 g di zucchero semolato
1 cucchiaino abbondante di vaniglia Bourbon in polvere (oppure l'interno di due stecche di vaniglia)
60 g di lamponi freschi, lavati ed asciugati

per il frosting allo yogurt:

yogurt bianco al naturale ( circa 150g)
zucchero a velo (qualche cucchiaio)

per decorare:

fiori freschi
lamponi freschi

Mescolare la farina ed il sale in una ciotola. Montare le chiare d'uovo e quando iniziano ad assumere un consistenza cremosa aggiungere cremor tartaro e vaniglia. Continuare a montare fino a che ottenete un risultato simile a quello per le meringhe, senza che però i bianchi siano troppo “fermi”. Unire con delicatezza la farina, e con una spatola incorporarla all'uovo, dall'alto verso il basso. Assicuratevi che non ci siano grumi, quindi versate un terzo dell'impasto nello stampo. Aggiungere parte dei lamponi, incastrandoli leggermente nella pasta e ricoprire con un altro strato di impasto. Continuare fino a terminare, coprendo ovviamente d'impasto l'ultimo strato. Livellarlo con cura. Infornare a 180° e cuocere per 20-25 minuti, fino a che la superficie è dorata, controllando comunque la cottura con uno stecco.
Una volta cotto capovolgere lo stampo su un tagliere, senza sformarlo. Lasciarlo raffreddare completamente e poi sformare il dolce, aiutandosi con un coltellino.

Per il frosting mescolare semplicemente lo yogurt con lo zucchero a velo, nelle quantità che preferite. Versarlo sulla torta e decorare a piacere, con fiori freschi e lamponi.

Note:

  • IMPORTANTE: questo è un discorso che nasce sempre nel momento in cui si propone una angel cake, io giocherò d'anticipo. “È necessario possedere lo stampo apposito per angel-cake o ci si può arrangiare con un'altra forma simile?”. Io vi risponderò con il mio punto di vista e in base alla mia esperienza, credo sia in parte soggettiva la questione. Per quanto mi riguarda sì, lo stampo è praticamente essenziale. Come saprete la particolarità di questo stampo è quella che, oltre ad essere molto alto, possiede dei piedini che permettono di raffreddare “a forma in giù” il dolce in modo tale che nello sformarlo non rimanga interamente attaccato allo stampo (in ogni caso è probabile rimanga un po'craterica, vedi il mio esempio ;) ). Inoltre questo ragionamento segue il concetto base di questo dolce: senza nessuna traccia di grasso (in realtà inteso come burro o olio), nemmeno nello stampo. Credo che sia abbastanza facile capire che questo è possibile solo se si usa lo stampo originale. Detto questo, vi informo che comunque l'alternativa più diffusa (io non garantisco, non so dirvi se funziona realmente) è quella di usare uno stampo a ciambella dai bordi alti, da ungere con un filo d'olio vegetale o gli spray per dolci. Io se fossi in voi non oserei. Questo che vi ho proposto era il mio primo tentativo, e nonostante abbia seguito il procedimento in modo esatto, il dolce ha leggermente faticato ad uscire e la superficie non è perfettamente omogenea e senza imperfezioni. Secondo me non c'è partita. ;)
  • le dosi del frosting variano a piacere. Quelle fornite sono approssimate ma va molto a gusti. Gestite le quantità di yogurt e zucchero a seconda di quanto desiderate decorare la torta, e ugualmente bilanciate gli ingredienti in base al risultato che volete ottenere (più dolce o più naturale).


English version:

There would be many things I should tell you.
Many, maybe too much, are involved.
It's like if I weren't able to follow this story, that's actually mine.
I breathe the air of spring, a so different spring. Intense, without doubts. Full of something I can neither understand. It makes me loosing words. I will never forget this spring. Maybe it's like kind of rebirth. The beginning of a new chapter.

This post will be an ode to this magic season. With lots of colors, rose pink and flowers. A bit unusual and richer for sure. Many are the things which are changing, even here. Maybe it's time to update you about this revolution and what's coming. :) One step at time. I promise I'll tell you everything, in a particular post maybe. I think you deserve it.

I'm always keen (madly keen?!) to put flowers everywhere, lately. I'm surrounded by posies with carnations, chrysanthemums and crowfoots (these three are my favorite ;) ). I spent more time by the florist and in greenhouses than in gastronomic shops (and in my case that's worrying, trust me! :) ). Everywhere at home there are country-flowers bunches, vases and compositions. They're so lovely and make me smile. Actually I didn't believe to own the green thumb. Even though I've always helped mum, who's a great passionate of gardening, I didn't care so much about the topic. I loved decorations of the experts and floral design in general, but I've never tried to create something by myself. A bit ago, while I was reading a lifestyle magazine, the bulb in my head lighted up. In fact, a few days later I picked up scissors and a florist's wreath and I created this spring wreath, in a mostly improvised studio. The idea comes from a picture I had in my head since a while. An old wood front door, a wrought iron handle and this wreath, hung with a white ribbon.

As you probably know I simply go crazy for the rustic style (even a bit country-shabby) with which I grew up. You can obviously personalize it depending on the kind of environment and intern you choose. It's perfect in a country cottage as well as in a an elegant city flat. Even if I believe wood hasn't any rivals. ;)

Well, the lifestyle part I was waiting for is now unveiled (you find the tutorial description before the recipe). But now it's time to describe you the recipe. It's a fluffy angel cake with raspberries and a yogurt glaze. The most spongy and softest cake I've known. So terribly light and yummy. A sweet white puff. The simple flavor of the base is enriched by the acidulous of the raspberries and it's in contrast with the yogurt glaze. A wonderful cake for a tea-time in the garden, with some pink and white flags and a strawberries lemonade. And striped and dotted straws, obviously. Unavoidable.

Naive and fresh. A bit like me.

It remembers me the sparkling breeze of these lukewarm days, which fulls lungs and spirit.

A small flower of a field in a messy braid. A walk through large green sweeps, lying down watching the sky. That's spring, for me.

I deeply hope you'll love this post, as well as I did. <3


Spring wreath

what you need:

wreath of florist's foam (you can find it by the florist or in specialized shops)
a mix of green fresh branches (ask your florist to help you with the choice)
rosemary branches
green carnations
green chrysanthemums
daisies
florist's scissors

  1. Moist the wreath in a bowl with water and let it soaking for 5-7 minutes, dunking it completely.
  2. Move the wreath on a working board covered with a cloth, dribbling it a bit.
  3. Start with the green branches (including green carnations). Cut with scissors small tufts and pieces of the branch, clean the last part of the stem and insert them directly in the wreath. Start from the left half of the shape and keep to the right side ,in a clockwise way (probably it's the opposite for lefties). Cover the whole shape, trying to give symmetry and mixing the types of flowers, until you get a balanced result.
  4. Keep with the real flowers, so daises and chrysanthemums. As before, cut them and clean the stem from leafs. Insert them between the green parts, starting from one half to the other.
  5. Check the result, paying attention to small gaps or imperfections, which you eventually have to fix.


Notes:
  • The choice of flowers and plants is absolutely personal. It depends on your tastes, the availability of products, the result you want to get and the occasion. Ask your fav florist for advices.
  • The wreath is really perfect as a centerpiece for the table or a furniture. It's not so apt to be hung up on a front door. In fact, even if it has a specific waterproof base, the risk to moist the door is very high (above all if you own a wood door). Furthermore it's pretty heavy, you would have to hang it with spikes and hammer and so ruin the door.
  • The composition lives for 3-4 days, but it depends on the choice of the flowers. My advice is to spray it with fresh water every day (except for the day you create it) so that the foam is always a bit moist. Furthermore if green branches are more resistant while the flowers wither, you can change these last ones with fresh substitutes. In this way you will use it for a longer time.


Angel cake with raspberries and yogurt frosting

Ingredients:

for the angel cake:

65 g plain flour, sifted
1 pinch salt
6 egg whites
1 full tsp cream of tartar
150 g granulated sugar
1 full tsp vanilla Bourbon powder (or the inside part of two vanilla beans)
60 g fresh raspberries, washed and dried

for the yogurt frosting:

plain yogurt (circa 150 g)
icing sugar (some tbsp)

to decorate:

fresh flowers
fresh raspberries

Mix the flour and the salt together in a bowl. Beat whites until they get a creamy consistence then add cream of tartar and vanilla. Keep whisking until egg whites hold stiff peaks and look like meringue. Add carefully flour and whisk with a bowl scraper, up and down. Pay attention to lumps, your mixture should be homogeneous. Pour 1/3 of the dough into the cake mold. Put part of the raspberries, pressing them a bit into the dough and cover with other cake mixture. Keep doing this until you end, covering obviously the last layer with the dough. Level with care. Bake to 180° for 20-25 minutes until the crust is gold, checking anyway the baking with a toothpick.
Once the cake's baked turn the mold upside down on a cutting board, without turning the cake out. Leave to cool completely and then turn it out with the help of a knife.

For the frosting simply mix yogurt and icing sugar, in the doses you prefer. Pour it over the cake and decorate as you like, with fresh flowers and other raspberries.

Notes:

  • IMPORTANT: this is a matter which always comes out when we talk about angel cake, so I will anticipate it. “Is it necessary to own the specific angel cake mold or is it allowed to use other homemade alternatives?” . I'll answer honestly, depending on my opinion and personal experience, I think it's a pretty subjective matter. Well, yes, for me the original mold is basically essential. As you probably know, the peculiarity of this product is that it has got, except high edges, some supports which help to cool the cake upside down. In this way you can turn it out without problems, avoiding that the cake hangs up on the mold borders (it's easy it will be a bit “crateral” anyway, look my case ;) ). I think is pretty easy to understand that you will have this result just if you use the original mold. Furthermore this thinking follows the basic concept of this sweet: without any kind of fat (as butter or vegetable oil), not even in the mold. I give you anyway the other most common alternative (but I don't guarantee, I don't know if it really works), that's to use a classic bundt cake mold with high edges and grease it with vegetable oil or baking spray.
    This one was my first attempt and even if I exactly followed every step, it was a bit hard to turn the cake out and, as you can see, the surface isn't perfectly homogenous. So for me there's no battle. ;)
  • the doses of the frosting are personal. Those ones I gave you are approximately right but it depends on you. Check the quantity of yogurt and sugar depending on the result you want to get (a lot of decoration or less of it) and balance the ingredients so that you can have the right flavor you desired (sweeter or more natural).

'cause it's not just a recipe. It's a story.

$
0
0


Ve lo confesso: non avrei mai pensato di riuscirci davvero.

Avevo aspettato questo momento da tempo, credo dagli albori di Me and food.


Ho tenuto tanti piccoli progetti (ambizioni?!) nascosti in un cassetto, che forse per troppo tempo avevo abbandonato e chiuso a chiave. Pensare di aprirlo mi spaventava. Credevo di interrompere un equilibrio, che poi così stabile non era.

Non ne avevo il coraggio. Il coraggio. Forse la chiave che ha fatto in modo che lo riaprissi. Mi ci sono persa e ho avuto paura per qualche istante. Poi però ho trovato un mondo nuovo, che non avevo immaginato.


Il mio di mondo. Il mio posto, le mie risposte. Li vedevo.


Non lo so se sono pronta, però una cosa l'ho imparata.

Ascoltarsi è l'unica soluzione. E non c'è via di uscita.


Il video, quindi. Questa la sorpresa che vi avevo accennato qualche mese fa. Non potete immaginare quanto sia soddisfatta del mio primo post con video (disponibile su Vimeo). Il mio primo esperimento con delle riprese. Un'esperienza che non dimenticherò. Con risate, sacchi di farina e props appiccicosi. Un'assistente speciale e paziente, che ha saputo supportarmi e aiutarmi.

Un video casalingo e spontaneo. Con sviste ed imperfezioni.

Sincero, semplicemente.


È una storia (non chiamatela video-ricetta), che racconta di una giovane ragazza che ha sempre amato le cose semplici e genuine. Che impazzisce per i vestiti di jeans e le trecce di lato. Che non cucina mai senza grembiule. Che sorride vedendo un vaso di fiori freschi.

E che in un pomeriggio di primavera ha cucinato delle soffici shortcakes al latticello.

Poi le ha mangiate con frutti rossi freschi e panna montata.

E una spolverata di zucchero a velo, sì.

Come dimenticarlo. :)


Ecco, questa è la miastoria:


(cliccate sull'immagine-video per riprodurlo oppure guardatelo qui)
 
(click the image-video below to reproduce it or watch it here)


 shortcakes al latticello con frutti rossi freschi e panna


tratta e modificata da The Kinfolk Table, Recipes for small gatherings, Nathan Williams


ingredienti:


210 g di farina, setacciata

50 g di zucchero

6 g (2 cucchiaini circa) di lievito bio per dolci

un pizzico di vaniglia Bourbon in polvere

115 g di burro a tocchetti, morbido

80 ml di latticello

1 uovo, sbattuto


in più:


burro sciolto

zucchero


per servire:


frutti rossi misti freschi, lavati ed asciugati

panna semi-montata

zucchero a velo


In una ciotola capiente mescolare con un cucchiaio di legno la farina, lo zucchero, il lievito e la vaniglia. Aggiungere il burro a pezzi e con la punta delle dita iniziare ad impastare, incorporandolo agli ingredienti secchi. Continuare fino a che si ottiene una consistenza molto granulosa, somigliante al pangrattato. Unire il latticello e l'uovo, continuare a mescolare con un cucchiaio di legno. Quando l'impasto ha una consistenza soda ed omogenea trasferirlo su un piano di lavoro ben infarinato e lavorarlo, per ottenere una palla liscia. Dividerla in sei parti uguali, formando palline della stessa dimensione. Schiacciarle leggermente e metterle su una teglia rivestita di carta forno. Spennellarle con il burro fuso e spolverizzarle con dello zucchero. Infornare a 180° e cuocere per circa 20-25 minuti. Controllare la cottura con lo stecco.


Servire le shortcakes tiepide con qualche cucchiaio di panna semi-montata e qualche cucchiaio di frutti freschi. Spolverate con abbondante zucchero a velo.


Note:


  • la base del dolce non è molto zuccherata se mangiata singolarmente. I frutti, la panna e lo zucchero a velo completano e bilanciano perfettamente il piatto. È comunque possibile aggiungere un po' di zucchero all'impasto, soprattutto se avete intenzione di mangiarli da soli. Le vere shortcakes però desiderano sempre un po' di panna e frutti rossi (anche delle semplici fragole vanno bene). ;)
  • usate gli ingredienti a temperatura ambiente.


English version:


I confess it: I've never thought to really succeed in it.

I've been waiting for this moment since a lot of time, I guess from the dawn of Me and food.


I held many small projects (ambitions?!) hidden in a drawer, which I left abandoned and locked up. The thinking of opening it scared me. I believed I would have broken a balance, which actually wasn't so steady.

I hadn't the courage. Courage. Maybe the key which made me opening it again. I was lost in it and I was frightened at first. But after that, I found a new world which I didn't imagine.


My world. My place, my answers. I was seeing them.


I don't know if I'm ready, but I learned a thing.

The only solution is to hear your inside soul. There's no way out.


So, the video. This the surprise I roughed out some time ago. You can't imagine how happy and satisfied about my first post with video (available on Vimeo) I am. My first attempt with shots. An experience I won't forget. With tons of laughs, flour sacks and sticky props. A special and patient assistant, who was able to support and help me.

A home-made and spontaneous video. With slips and imperfections, for sure.

It's honest, in a so simple way.


It's a story (not a video-recipe) which tells about a young girl who has always loved simple and true things. She gets crazy for jeans dresses and braids by a side. She never cooks without apron. She smiles watching a flower bunch in a vase.

And during an afternoon of Spring she baked some spongy and fluffy buttermilk shortcakes.

And then she ate them with fresh berries and whipped cream.

Oh, and a huge wipe of icing sugar.

How to forget it. :)


Well, this is my story:


(video)

 
Buttermilk Shortcakes with whipped cream and fresh berries


adapted from The Kinfolk Table, Recipes for small gatherings, Nathan Williams


Ingredients:


210 g plain flour, sifted

50 g sugar

6 g (circa 2 tsp) bio baking powder

one pinch vanilla Bourbon powder

115 g butter, cut into small pieces and chilled

80 ml buttermilk

1 beaten egg


plus:


melted butter

sugar


to serve:


fresh berries, washed and dried

whipped cream

icing sugar


Combine in a large bowl flour, sugar, baking powder and vanilla. Mix with a wood spoon. Add the butter and start kneading with the top of your fingers, incorporating it to the dry ingredients. Keep working until you get a nubby consistence (crumbled). Add buttermilk and the egg, keeping mixing with the spoon. When the dough is homogenous, move it on a well-floured working board and work it to obtain a smooth ball. Divide the mixture into six same parts, shaping balls with the same size. Press them a bit and put them into a baking tray covered with wax paper. Brush the shortcakes with some melted butter and sprinkle with sugar. Bake to 180° for 20-25 minutes, checking the baking with a toothpick.


Serve the shortcakes lukewarmwith some spoons of whipped cream and some berries. Sprinkle with lot of icing sugar.


Notes:

  • the cake base isn't very sugary if you eat it alone. Berries, cream and icing sugar complete and balance perfectly the shortcakes. Anyway you can add some sugar (don't exaggerate) if you want to eat them as they are. Actually the real version of the cake wants a bit of cream and some berries (even strawberries are so good). And trust me, there's a why! ;)
  • use ingredients at room temperature.


One day you will understand :)

$
0
0


 Ok. Ci siamo.


È arrivato il momento di quel famoso post. Quello delle spiegazioni (forse confessioni?!), delle novità e aggiornamenti, quello dei cambiamenti. Quello che vi devo, ormai da un po'.


Tempo fa, esattamente qui, avevo parlato di rivoluzione. Una rivoluzione che sentivo stesse accadendo, stesse per arrivare. Non capivo cosa fosse in atto, cosa mi aspettava e cosa avrei trovato. Dopo aver tentato di fingere, di non ascoltare questo stimolo e quei pensieri, ho ceduto ad una forza più forte di me. Ho imparato a sentire la mia anima. In ogni sua vibrazione. Ho imparato ad interpretarne i segnali. E forse ad accettarla. Sebbene contorta, a momenti. Vivace. Più di quel che pensavo.


Questo periodo è stato molto particolare, ne sono successe di cose in questi mesi. Ci sono state decisioni e scelte importanti. Che ho fatto per me certo, ma che sono costate molto. La maggior parte di tutto questo non era in programma (ve lo ricordate, quello a punti?!) e non lo avrei mai immaginato. A volte mi sono sentita fragile ed impotente. Poi però una strana energia, mi piace chiamarla magnetismo, che non conoscevo prima, mi ha portato in luoghi e mondi nuovi.

Sono nati nuovi interessi, nuovi progetti e nuovi sogni. Mi stavo trasformando.

Sentivo (e sento ancora) il peso di questo processo che non terminerà presto, che forse non avrà mai fine.


Ho trovato le risposte, quelle che cercavo. Così nitide.

Sì, non sono un tipo facile. Ci vorrà del tempo. Io mi metto in marcia, intanto.

Qualcuno mi ha detto che il resto, se c'è impegno e sacrificio, verrà da sè.


Sono cambiata io, quindi. Con diversi occhi e punti di vista. Ho cambiato testa. E con me anche il blog è cresciuto. L'ho sempre visto come il mio rifugio e sarà per sempre così. Con il tempo però, ho iniziato a specchiarmici. Mi vedevo riflessa, nelle parole, nelle foto e nelle scelte delle ricette.

Me and foodè sempre stato più di un blog di cucina, credo che anche chi mi legge lo abbia sempre potuto percepire. Il nome può ingannare, è vero. In realtà però dietro a quel titolo si nasconde un mondo ricchissimo di interessi e progetti, anche diversi dal food.

C'è il mio di mondo. Fatto di picnic all'aria aperta, brunch domenicali, riviste di lifestyle e fiori di primavera.


Ho inserito qualche novità (la corona di margherite e il video) senza annunciarle, ma in realtà i progetti sono chiari e non è stato un caso.

Me and food non sarà più un mero blog di cucina. Il food sarà l'elemento principale, al quale però verranno aggiunti nuovi mondi. Il lifestyle in primis, qualcosa di design (su questo dobbiamo lavorarci ancora un po'), fotografia (come dimenticarla), scrittura (altrimenti sapete che soffoco senza le mie parole) e perchè no, travel. La base sarà sempre la stessa, le origini rimarranno quelle. Però gli orizzonti si allargheranno. Vi assicuro che ci saranno molte sorprese. 


 Ed ora, è tempo di annunci. Seriamente.


Tra poco partirò e abbandonerò il Bel Paese per seguire alcuni progetti e (anche) per questo ci saranno alcune modifiche (più o meno importanti).


La prima cosa che tengo a dirvi è che il blog, d'ora in poi, sarà pubblicato solo in inglese. Ovviamente rimarranno i precedenti post in italiano, o quelli più recenti bilingue, ma per il resto tutto sarà (quasi) esclusivamente in lingua inglese. In realtà avevo anticipato questa pratica su Facebook, se mi seguite saprete che non scrivo in italiano da tempo, fatta eccezione per qualche occasione speciale.

D'ora in poi, comunque l'inglese sarà presente sia su social che sul blog, appunto forse con qualche rara eccezione.


Molti forse non condivideranno, essendo questo blog nato e cresciuto in Italia (come la sottoscritta del resto), ma i motivi di questa scelta sono molteplici, alcuni anche personali.


Sarò sempre disponibile a rispondervi se mi contatterete privatamente per aiuti o dubbi, ma non posso davvero fare altrimenti. Lascerò senza dubbio il traduttore (so che non è ottimo, ma può aiutare chi sarà in difficoltà) e spero con il cuore non mi odierete.


La seconda è che nei prossimi tempi sarà probabile non tornerò spesso sul blog. Sarò molto impegnata e non conosco ancora come andranno perfettamente le cose. Non lo abbandonerò di certo, soprattutto in questa fase. Ci sarò, con qualche novità e qualche nuovo post (non so bene cosa vi porterò, ma credo vi piacerà ;)). In compenso, vi annuncio che potrete seguirmi attraverso i social, che come forse già saprete non amo molto, ma che obbiettivamente risultano essere l'unica alternativa per rimanere connessi. Ho persino ceduto ad Instagram per permettervi di seguirmi ;) . Creerò una specie di diario (fotografico), che percorrerà (moderatamente, non occorre dirlo) il mio nuovo viaggio. Qualche semplice parola e foto di quotidianità-food-posti nuovi.


Sì, a momenti ci sarà del silenzio.

Credetemi però, a volte vuol dir più di fiumi di parole.


L'ultimo post quindi e le ultime ricette. Con il rabarbaro, uno dei miei frutti preferiti.

Immagino le friands in una vetrina di un caffè di Stoccolma. E il rabarbaro al forno in un appartamento minuscolo di Notting Hill.


Forse un giorno capirete.


Non c'è molto da dire, semplicemente che le dedico a voi.

A chi mi segue e lascia un suo segno, e a chi lo fa in silenzio.

Vorrei che foste con me in questa nuova avventura.


Vi aspetto su Instagram (mi raccomando, seguitemi!) e su Facebook!


Buon inizio d'estate, gente!

Buona fortuna.<3


friands al rabarbaro
tratta e modificata da What Katie Ate, Katie Quinn Davies

ingredienti:

per circa 10 tortine


10 albumi

300 g di burro fuso

175 g di farina di mandorle

250 g di zucchero a velo (+ per spolverare)

100 g di farina, setacciata

4-5 coste di rabarbaro, lavate ed asciugate


Ungere leggermente degli stampini per tortine (o gli appositi per financiers). Tagliare il rabarbaro a pezzetti e lasciare da parte.

Sbattere per alcuni minuti i bianchi d'uovo senza che si montino eccessivamente. Aggiungere il burro, la farina di mandorle, lo zucchero a velo ( a cucchiaiate) e infine la farina, continuando a sbattere. Amalgamare bene il composto e aggiungere un pugno di rabarbaro a pezzi, mescolare con cura. Versare l'impasto negli stampini, riempendoli fino a due terzi. Incastrare sulla superficie dei dolcetti il restante rabarbaro, premendo verso l'interno.

Cuocere a 180° per 25-30 minuti, o fino a quando la superficie delle tortine è dorata e i dolci superano la prova stecco.


Servire i dolcetti con tanto zucchero a velo.


Note:

  • potete utilizzare la frutta che preferite (frutti rossi, fragole, pesche a pezzetti) e sostituire la farina di mandorle con quella di nocciole.
  • Personalmente sono più buoni se riposati (il giorno seguente o quello dopo ancora).


rabarbaroal forno allo zenzero e arancia con yogurt greco


ingredienti:


per il rabarbaro al forno:


500 g di rabarbaro, pelato e lavato

il succo di un'arancia media (circa 100 ml)

1 cucchiaino di zenzero fresco grattugiato

100 g di zucchero


per lo yogurt:


qualche cucchiaiata di yogurt greco

qualche cucchiaino di zucchero

scorzetta di arancia grattugiata


Tagliare il rabarbaro per il lungo, in tronchetti. Posizionarli in una teglia da forno. In una ciotolina mescolare il succo dell'arancia con lo zenzero e versarlo sul rabarbaro. Spolverizzare con lo zucchero e mescolare per combinare il condimento. Infornare a 180° per circa 30-35 minuti, o fino a che la frutta è morbida ma non completamente molliccia.


Per lo yogurt mescolare semplicemente il latticino con lo zucchero, nella quantità che desiderate.


Quando il rabarbaro è pronto, lasciarlo riposare. Servirlo tiepido o freddo con lo yogurt accanto e un po' di scorzetta d'arancia, irrorando con lo sciroppo di cottura.


Note:

  • in alternativa potete servire il rabarbaro con della panna oppure con dello yogurt magro semplice.
  • ottimo da gustare a colazione con un po' di granola homemade o un mix di cereali.


English version:


Well, here we are.


It's time for that famous post. That one with explanations (confessions maybe?!), news and upgrades, that one with changes. That one I owe you by now from a while.


A while ago, right here, I told you about revolution. I felt this revolution which was happening and coming. I didn't understand what was going on and what I'd find. After trying to fake, not to listen that stirring and those thoughts, I surrendered to this power, for sure stronger than me. I learned to feel my soul. Each of its inside vibrations. I learned to interpret its signs. And maybe to accept it too. Although twisted, sometimes. And intense. More than what I thought.


This period was pretty a particular one, so many things happened during these months. There were decisions and important choices. I took them for me of course, but they demanded a lot. The main part of them was unexpected (do you remember the point by point schedule?!) and I've never imaged it. I sometimes felt weak and powerless. But then a weird energy, I like calling it magnetism,which I've never experienced, brought me to new worlds and places.

New interests, projects and dreams were rising. It was kind of transformation.


I felt (I still do it) the spiritual weight of this process which won't be over soon, which probably will never end at all.


I found the answers I was looking for. They were so clear.

It will take time. Meanwhile I march off.

Someone told me that the rest will come itself, if there are diligence and sacrifice.


I changed, so. I have different eyes and points of view. A different mind. And with me, even the blog grew up. I've always seen it as a shelter and it will be so for ever. Time passed and I understood It was mirroring me. I saw my reflection, through the words, pictures and the recipe's choices.

Me and food has always been a food blog for sure, I think it's a pretty easy concept to capture. The name may mislead, it's true. Behind that title a hidden and sparkling world, rich of interest and projects (it's not just all around food), is actually living. There's my world. Made of outdoors picnics, Sunday brunches, lifestyle magazines and springy flowers.


I added some new elements (the spring wreath and the video) and I didn't announce them officially, but actually projects are clear , it wasn't by chance.

Me and food won't be anymore just a simple food blog. Food will always be the main topic, but many other spheres will turn around it. Firstly lifestyle, something about design (I have to work a bit more on this part), photography (how to forget it!), writing (you know I can't live without my words) and travel, why not.

The base will be the same, the origins won't change. But horizons will broaden. I ensure you so many surprises will come.


Now, it's time for announcements. Seriously.


I will leave in a few days and will be abroad to follow some projects and (even) 'cause of this there will be some modifications (more important or not).


Firstly, I want to tell you that the blog will be written and published only in english from now on (I know english followers will be desperate 'cause of my bad english! I apologize folks and promise to improve it very soon!). Older italian or more recent bilingual posts will remain for sure, but the rest will be (almost) completely in english.

Actually I was doing this since a lot on Facebook, if you follow me there you probably know I use italian only for some special occasions.


Anyways, english will be both on the blog and on socials, as I said, with some particulars exceptions.


Many of you won't share my decision since this blog was born and “raised” in Italy ( as me), the reasons of this are many, some of them are personal too.


I'll be always available to reply if you will contact me privately for help or doubts. The translator (I know it's not great but will be necessary for those who are in spot) will be always here to give you a hand, I deeply hope you won't hate me.


Secondly I want to let you know I won't come back very often on the blog in the next summery weeks. I'll be pretty busy and I still don't know how things will develop. I won't leave it for sure, above all during this important phase. I'll be here with something new and new posts (I don't know well what they will be about but I think you will like them ;) ). To make up for this, I announce you that you can follow me through my social profiles, which I don't like so much (as you know), but they are objectively the only solution to keep in touch and stay tuned. I even caved in with Instagram to let you follow me ;). I'll create kind of (photographic) diary, which will go through my new experience (with moderation, goes without saying). Some simple words and pics of everyday life, food experiences and new places.


There'll be silence maybe.

But trust me, sometimes it means more than streams of words.


So, this is the last post and recipes. With rhubarb, one of my fav fruit.

I imagine these friands in a showcase of a coffee shop in Stockholm. And the roasted rhubarb in a tiny flat of Notting Hill.


Maybe one day you'll understand.


There's nothing more to say, except the fact I want to dedicate these recipes to you.

To whom follows me leaving a sign and to those are doing it in silence.

I'd like you would be with me in this new adventure.


I wait for you on Instagram (follow me!) and on Facebook!


Happy beginning of Summer, folks!

Good luck. <3


rhubarbfriands
adapted from What Katie ate, Katie Quinn Davies

ingredients:


10 egg whites

300 g melted butter

175 g almond meal

250 g icing sugar (+ for dusting)

100 g plain flour, sifted

4-5 rhubarb sticks, washed and dried


Lightly grease some small molds for minicakes (or those specific ones for friands). Cut the rhubarb into small pieces and let aside. Whisk the egg whites for some minutes, they don't have to be whipped into peaks. Add the butter, almond meal, icing sugar and flour and beat to combine. Add a punch of rhubarb, mix with care. Pour into the cake molds, filling to two-thirds full. Place the remaining rhubarb on top of each cake, pressing them a bit into the dough.

Bake to 180° for 25-30 minutes, or until the friands are golden and they overcome the toothpick's test.


Serve them with a dust of icing sugar.


Notes:

  • for this recipe you can use your fav fruit for sure (red fruits, strawberries, peaches) and substitute almond meal with hazelnut flour.
  • Personally, they're better if they rest for a bit (the next day or even that one after).


Ginger and orange Roasted rhubarb with greek yogurt

ingredients:


for the roasted rhubarb:


500 g rhubarb, peeled and washed

the juice of an orange (circa 100 ml)

1 tsp fresh grated ginger

100 g sugar


for the yogurt:


some spoonfuls greek yogurt

some tsps sugar

grated orange zest


Cut the rhubarb into thin logs. Place them in a baking tray. In a small bowl mix the orange juice and ginger, pour this seasoning on the rhubarb. Dust with sugar and mix to combine. Bake to 180° for circa 30-35 minutes or until fruit is soft but not mushy.


For the yogurt simply mix it with as much sugar as you like.


When rhubarb's ready, let it rest. Serve it lukewarm or cold with yogurt by the side and a bit of orange zest, sprinkling with the sirup of the baking.


Notes:

  • you can serve the rhubarb with cream (whipped) or simple whole yogurt.
  • It's great for breakfast with a bit of homemade granola or a cereal mix.


Summer swiss roll cake :)

$
0
0


So, here we are again.

I can't even describe how weird is coming back here (and at home as well). It was a very long time I didn't visit the blog anymore. For once again, I disappeared somewhere in the world looking for new things and ideas. ;)
Joking apart, many things have changed in these three months of stillness. It is always the same: when changes take place in my life I explain and show them after a while. I think it is mainly a matter of understanding what's going on. And I have to do it by myself, alone. Far away from my normality.

I missed the blog-routine. I missed writing above all, and cooking. That's what I was thinking about most of the time. The desire to bake a yummy chocolate cake or an unlimited tower of pancakes was so strong. With some new fabulous cookbooks in my hands, I thought I could get crazy at all. Thanks God I had my camera with (actually almost new camera. Yes, finally it turned into a 5d Mark II!!) and my lovely chubby Fuji as well, with which I took tons of pictures. I think it was a silent way to express my feelings in completely (or almost) unknown places of a huge metropolitan city. I really felt I lost words sometimes and pictures could say them better than me. And I learned it, with this experience. A camera was all what I needed. The rest was unnecessary.

I still have to realize so many things about what happened. I'd like to understand the meaning it had for me and who I am now thanks to it. Here I said that you would have understood one day, but actually I think it is not the right moment yet.
Patience and time. These the two things I still have to learn about life.
I will introduce news once at time, calmly. I need to stop and breathe. For a little only.
Tidy up all the mess around and inside me and keep going with this new chapter.

New things will happen here too. I promise I'll tell you everything. But not now. I think we have time, don't we?


The swirly swiss roll cake you see is the one I baked some days ago for my dad's birthday party. It was such a lovely family party my sister and I organized in one of our fav places located in our valley. It was a pic-nic party with tons of good and healthy food, great beer and sun which my place hasn't seen for a long time during the Summer (and which seems totally disappeared even now).

I was thinking of this pic-nic since the whole Summer and I was happy we could enjoy it together. The menu was pretty off topic (I mean, I decided to prepare falafel and cous cous for a pic-nic at 2040 m of altitude!) and definitely far away from the traditional dishes in my area, but in the end it turned into the perfect choice for the occasion. Summery and fresh flavors for one of the unique sunny day of this crazy italian Summer (I was told about this by family, of course).


The cake was my very first attempt with the genre (yep, I like making my life complicated ;) ). The idea of baking a swiss roll cake has always scared me, mainly because I heard about the delicate dough you have to work with and that it could easily go broken when you are rolling it. Actually, I can say I was very lucky with the crucial passage (and you will say it's the beginner's luck. And I will say “yes it is”, 'cause I basically followed the wrong order of steps all the recipe long but this didn't compromise the result, don't ask why since I really don't know the answer!) and I think the final result can prove it was the first time. It is a bit flattened/pressed and not very round or swirl, but it was incredibly delicious so that I decided to post it anyway. The base was moist and fluffy and the filling so yummy. I avoided cream since I don't like very creamy (I mean with tons of whipped cream) sweets and I used ricotta instead. I found out it is a super valid substitute, healthier and lighter. I simply added a homemade blackberry compote a friend gave me and the cake was done.
You can put every ingredient you prefer, such as fresh fruit pieces with the sugared ricotta. It would work for sure! And if you want to overdo, let's put a (moderate) layer of chilled Nutella or chocolate cream. And with a swipe of icing sugar heaven is almost there.

It is so great being back here, folks.
I really missed this place.

Enjoy :)


Summer swiss roll cake (with ricotta and blackberry compote)

Ingredients:

for the swiss roll cake base:

120 g sugar
60 g plain flour
2 eggs
butter for the baking tray

for the filling:

250 g ricotta
some tbs sugar
blackberry compote or any other pretty liquid jam

to serve:
icing sugar

Whip the egg yolks with 60 g of sugar until you get a very whipped and fluffy mixture. Beat the white eggs with the left sugar until stiff. Mix the two mixtures lightly with delicate movements (keeping a whipped texture). Add the flour slowly, sifting it in the dough and keep mixing.
Grease a baking tray with butter and cover it with waxed paper and roll out the pastry until you have a thickness of 1.5 cm. Bake it to 180° for around 10 minutes.

Take the base off the oven and turn it upside down on a kitchen cloth (with the waxed paper upwards). Remove the paper quickly from the base. Roll the pastry tight to the cloth and let the base completely cool. Unroll carefully the cake.

Mix ricotta with sugar until in order to have a soft cream. Spread a first layer with the sugared ricotta and then add some spoons of compote swirling the two stuffings. Roll the cake again.

For a top result: at this point, put the swiss roll cake inside a piece of waxed paper and roll it tight. Close the edges of the paper as a candy packaging. Leave it in a cool place for one hour.

When you serve: sift some icing sugar on the top of the cake. It is undoubtedly better with it.

Tips:
  • if you are in a hurry (as I was ;) ), you can skip the hour of rest at the end of the preparation. Simply sift some icing sugar and serve. It goes without saying that in this case the result won't be perfect at all (you will have the flattened cake I had ;) ) but the taste won't suffer for it. It is an aesthetic matter which is important to consider. Doubtless if you follow every right step you will get a top swiss roll cake. Which is better! :)


Kanelbullar.

$
0
0


I think I wrote- or better I tried to write- this post at least three times. Even four perhaps.

It's incredible how things have changed in those months and how far this place seems to be from me. Sometimes it's hard to understand what happened, I found no answer to that question.

Thus, I just accept the fact that even coming here, posting and shooting recipes has become a bit unusual and unnatural to me. It's the normal stage each change has to experience, I think. And there's no escape to this.


I wanted to talk about lovely autumnal feelings and amazing Nordic sceneries, about simple and small things in life, about breathing the very first biting breeze of Fall. But none of these seems to be available for now. Anyway. I just couldn't resist to let these amazing pictures and subjects in a forgotten folder of my laptop. So here there is the story:


Everything started with my huge nostalgia of the happy times I lived in Stockholm. I've already told the people of Instagram, that this episode already took place while I was living in London. I remember I was at Ally Pally's farmers market, North London (I could show you some of my shoots there, actually. It's just one of the loveliest farmers market in whole London). I was shooting and looking at each of the stands. With bright eyes, I was so happy in front of all those organic products. And my belly was trying to resist to that large number of yummy things -there was no match, indeed. Ops! ;) When I noticed the Nordic-inspired bakery stand, I was just like in heaven. The nostalgia of Scandinavia went along me during the whole summertime and that stand made me feel a bit back to Stockholm. When I saw cinnamon buns I was even more exited to have finally the chance to eat those delish buns again. I immediately bought a very big one. Well. What I can say is that even though the all fact of finding them in the UK was great, unfortunately all the sweet memories of Sweden which came with it suddenly disappeared - at the first bite. I don't know if it was 'cause of the hot weather of this weird British summer or what (else), but the taste was just different. It was a quite nice bun with a very light hint of cinnamon, but nothing that could be named Kanelbulle. It didn't help with my nostalgia and after that I just quit with the idea of finding original Nordic cinnamon buns out of Nordic countries.


It was two weeks ago, I think. My huge need of cinnamon-after all it's Fall now, which means cinnamon (basically) everywhere – was getting stronger and stronger and it was a terrible long time I wasn't baking anything delicious for my dears. Ally Pally's adventure has been a useful lesson and fresh memory, so I was pretty undecided on what to do. At the end I actually just said: “Let's do this.” They couldn't turn out worst than Ally Pally's ones, I didn't have anything to loose. And I have never regret it. 'Cause although it was my very first attempt with them, my kanalebullar were simply amazing. I don't say they were perfect – I have to practice with shaping them better and I didn't find the right pearl sugar you need to top them – but the taste was really close to perfection. And they tasted really as the originals. :)

You can imagine how enjoyable those breakfasts have been. After a pretty long time I finally felt the same emotions of my trip in Sweden. I remember those chilled and lovely breakfast and fikas I had. I remember how well I felt in that culture and life. I'm so eager to go back there soon. 
And Rosendals Trädgård, with that coffee, daisies and one of the best bullar of Stockholm, this one here

| This picture below was a shoot of my improvised styling workshop in Rosendals T., Stockholm. Vette's bulle + swedish latte + wild daises from the lawn. :) |


If you have never tried them, then it's time. Swedish ones are the top, but I've learned you can feel a bit of North even if you bake them at home, no matter where you live. They are truly easy to prepare. You just need patience and practice. As for everything after all. :)


ps. I apologize for not replying at your last comments on the blog, unfortunately there is a problem with the platform. I'm trying to fix it since a while but without nice results. I hope you'll understand and that it will be solved soon. Nevertheless, I want to remember all of you I am so grateful for your comments or simple silent presence. I know you are with me, always. Thank you from the bottom of my heart. 


Kanelbullar (swedish typical cinnamon buns)

adapted from Scandilicious | Baking, Signe Johansen


makes 20-22 buns


Ingredients:


for the dough:


225 ml whole milk

75 g butter

425 g plain flour

80 g sugar

1 tsp freshly ground cardamom

1 pinch of salt

20 g fresh yeast

1 egg, beaten


for the filling:


75 g butter, softened

50 g brown sugar

2 tsp cinnamon

1 pinch of vanilla bean powder


to finish:


1 egg, beaten

sugar or pearl sugar


Heat the milk in a saucepan together with the butter until it is almost boiling and let it cool.

Sift the dry ingredients in a large bowl and mix them. Cream the yeast with one or two tsp of sugar until it is almost liquid. Add it to the dry ingredients. Make a well in the middle of the dry ingredients, add the beaten egg and the milk-butter mixture. Stir everything together until you get a moist and soft dough. Cover the bowl with a kitchen cloth and leave it to rise in a warm place for at least 1 hour.


In the meantime, prepare the filling by creaming the butter, sugar, cinnamon and vanilla bean powder in a bowl and let aside.


When the dough has rested, pour it over a well-floured surface and start working it with the hands until it doesn't stick anymore. Roll out the dough with a rolling pin until it forms like a rectangle of 35x25 cm. Spread the filling evenly over the dough, starting from the middle to the edge. Fill the whole surface until the extreme edge of the rectangle.

At this point, fold the dough two times like if you were packing a letter. Cut the roll into pieces and twist them around your hand to create knot buns. Place them on a baking tray covered with parchment paper. Repeat until you end the whole dough. Cover the trays with a kitchen cloth and let the buns rest for further 30 minutes.


Preheat the oven to 180°. Glaze the buns with beaten egg and sprinkle the sugar or pearl sugar. Bake them for 15-20 minutes or until the surface as well as the base are golden brown.


Allow to cool and serve.


Notes:

  • these deliciousness last easily for two-three days. Conserve them into a Tupperware or wrapped into aluminum foil.


Running for "New".

$
0
0


Sono partita. Sono tornata. Adesso riparto.

Questo era ciò che avevo scritto nello scorso post. Era questa la scaletta da seguire e ho mantenuto la parola.


Sono stati tempi strani, questi passati. Tempi pieni di cose da fare, di programmi ad incastro, di frenesia (quella che però ti fa star bene), di agende pronte per essere riempite, di piccole soddisfazioni, a volte di qualche dubbio. Momenti in cui pensi che tutto stia andando per il meglio, in cui non vedi l’ora di conoscere il “nuovo” che ti aspetta. Altri (momenti) in cui ti senti vuota. Persa.


Una settimana di “isolamento dal mondo” trascorsa tra passeggiate mattutine in riva al mare,  e lunghi pensieri notturni tra le deserte stradine della parte vecchia della città, con la lacrima sempre pronta. Perché sì, alcuni posti e alcune situazioni fanno quest’effetto. Quando, come diceva Terzani, ti fermi in silenzio ad ascoltare il respiro dell’universo, e il tuo. Quando la grandezza della natura ti travolge e, per un momento solo, ti fa sentire eterno.


Sono tornata poi, con un chilo di limoni della zona (e mò con un chilo di limoni che faccio?! ;) ), olive e olio, un magnifico (nostalgico) ricordo delle mirabellese una strana energia positiva, che prometteva bene.  Così ho ripreso un ritmo, tra progetti e piccole collaborazioni, nuove proposte e forse nuove idee. Ho cucinato molto, sia per “lavoro” che per piacere; mi mancava stare in cucina, come una volta, io con i miei attrezzi e il mio forno. Ho rispolverato vecchi pensieri, li ho osservati e ho cercato di capirli. Forse, dopo un periodo di straordinaria spensieratezza e pazzo atteggiamento naif, ho ritrovato una traccia da seguire. L’unico quesito, ancora irrisolto, è di capire  se sono stata io a tracciare quella strada. Se sarà la mia strada. 


 Ho ripreso la macchina, di nuovo. Dopo tanto tempo. Ho deciso di ricominciare, di tornare qui con la necessità di farlo, salutando quel dovere che invece non mi lasciava stare, ascoltando il mio bisogno, e i dubbi che non posso soffocare.


Fotografo sì, anche e soprattutto food, ma per il piacere di farlo. Perché mi piace, mi è piaciuto in passato e credo (spero) lo farà ancora. Non perché devo postare, perché deve esserci la ricetta della settimana, perché ho un blog di cucina che dovrebbe esser aggiornato, altrimenti, chi ti fila più. Così, oggi, un nuovo tipo di post, che forse voi non apprezzerete. Che crederete inutile o difficile da interpretare. Un post senza ricetta, con un piatto, con i miei racconti, ma con la fotografia protagonista. Vorrei dare importanza agli scatti, alla parte fotografica, perché il blog, oltre alle mie parole e alle preparazione dei piatti, è fotografie, che trasmettono emozioni, più o meno piacevoli, che parlano, e che nascondono tanto lavoro e dedizione, forse ancora invisibili data la mia inesperienza, ma che fidatevi ci sono eccome.


Non mancherà la descrizione del soggetto, ovviamente. Prendetela come una sorta di esercizio che mi assegno da sola. Perché avevo un piccolo obbiettivo, impostatomi un po’ di tempo fa, e farò il possibile per arrivare, lì.


Vi lascio pochi scatti oggi, di una galetterustica alla farina d’avena con susine goccia d’oro (sì, sarebbero le mirabelles, ma in Italia non son belle come in Francia, piccoline e succosissime) e timo fresco. In realtà un po’ bruttina, ma così autentica e vera. Racconta di pomeriggi settembrini diversi, liberi ma non più così leggeri. Di aria fredda che ormai ha già salutato la brezza estiva. Ora, davvero, è tutto pronto per accogliere l’Autunno.


Non occorre dirlo, sono graditi commenti e pareri (critiche comprese), consigli o dritte sulle foto, ma anche sull’idea del post fotografico come nuovo format (vi consiglio di cliccare su Flickr per vedere la vera resa degli scatti :) ).

Io preferisco la prima. La seconda fa più lifestyle ;)


Adesso vado, ve l’ho già detto. Con una nuova testa, nuovi occhi. Perché non posso fare nulla, ora. Sono cambiata e non tornerò indietro.


E’ tempo. Quel tempo.

Rimbaud e Sigur Rós.

Good luck <3

Eggs n#1: salty breakfast :)

$
0
0


Quando ti svegli la domenica mattina, e fuori piove. Una pioggia leggera, elegante, quasi impercettibile. La nebbia copre tutto il paesaggio e niente di quel che solitamente riconosci è visibile. Mi piace quando succede così. Perché in quel preciso momento, non importa se effettivamente sono a casa. Volendo, se solo gioco un po’ con la fantasia, potrei essere in qualsiasi parte del mondo, con quella nebbia. In un cottage finlandese con il camino già acceso come se fosse pieno inverno, in un prato verde e deserto islandese con un gran silenzio e solo un forte e freddo vento che colpisce il viso oppure al quinto piano di uno stabile ottocentesco parigino, Parigi, sempre nel cuore.


Quando sto bene basta poco per farmi viaggiare con la testa. Quando sono in pace, dentro di me, non occorre molto per farmi nascere un sorriso sul viso. Sarà quest’aria di cambiamento, che ormai respiro già da un po’, ce n’era un gran bisogno. Vi avevo già parlato di nuovi programmi, nuove esperienze e nuova me. Di una nuova vita. Me ne accorgo ogni giorno di più, quando sono di nuovo a casa. Che una volta partiti, è difficile tornare indietro. Che gli occhi con cui vedi le solite cose e persone mutano, che tutto diventa incredibilmente estraneo e lontano, anche se conosci perfettamente quel luogo, quelle abitudini. Ti accorgi che fuori, in realtà, nulla è diverso da prima, ma che comunque percepisci qualcosa di incredibilmente strano e nuovo. Ti senti maturata, cambiata, inizi a conoscerti. Capisci che vuoi continuare sulla strada verso il Mondo, verso il Nuovo.


Vi avevo promesso un post ricco, quindi continuiamo con le chiacchiere, che come sapete, mi riescono molto bene ;) Se non ricordo male, vi avevo accennato di alcune novità, ma soprattutto di un progetto a cui collaboro.


Partiamo dal progetto. :) Anche se ancora per poco, è questione di giorni, non posso rivelare tutti i dettagli, ma comunque vedrete che già con una piccola anteprma vi innamorerete di questa novità. Vi ho ancora parlato di Giulia, cara amica e proprietaria di Bianco Concept Store, negozio che molte di voi già conoscono, nonché uno dei miei preferiti in assoluto :). Proprio in questo post, senza farlo apposta, vi avevo accennato dei suoi articoli, molti sono un’ esclusiva in Italia, e anche dei tè Lov Organic. Questa una piccola traccia per farvi incuriosire: un evento/un progetto. Ci sarà Bianco, ci sarò io (con il blog), ci saranno i tè Lov e ci sarà il Grand Hotel Trento. Sarà un qualcosa di fantastico e divertente, credeteci. E a riguardo vi aspetto lunedì/martedì su Facebook, per tutti gli aggiornamenti e per l’effettivo lancio! :)


Per quanto concerne invece il post, la scorsa volta vi avevo proposto un genere prettamente fotografico, quello di oggi invece è mirato a portare alcune possibili idee secondo un preciso tema, che se riuscirò, porterò avanti in più “puntate”. Le protagoniste sono le uova e l'argomento è il brunch/ la colazione domenicale (sì, sono un po' fissata con i brunch ;) ). In poche parole parliamo di due ricette con le uova, entrambe salate, una molto classica e conosciuta (anche se proposta nella mia versione), l’altra semplice ma forse meno diffusa tra le tavole degli italiani, che rappresentano a mio vedere due fra le migliori alternative di colazione completa, su modello di quella inglese, che una volta ogni tanto vale la pena concedersi.


Vi lascio alla mia English breakfast e alla breakfast omelette, sperando che possano piacervi come spunti per i prossimi brunch d'autunno.  
La prossima (puntanta), ve lo anticipo, sarà tuttua dolce :)


Torno alla mia finestra, alla pioggia e alla nebbia.

Chissà dove andrò questa volta. ;)
A bientôt!


Omelette salata per la colazione (con prosciutto e formaggio)


Ingredienti:

per 2 omelette medie


per le omelette:

6 uova fresche bio

2 cucchiai di panna da cucina

2 pizzichi di sale

pepe

25 g di burro

2-3 cucchiai di olio evo


per la farcitura

3-4 fette di prosciutto cotto di qualità

4-5 fette di formaggio bianco bavarese (tipo Edamer)


come accompagnamento:

spinacino fresco, lavato ed asciugato

olio, aceto, sale

pomodorini al forno aromatizzati al timo (vedi ricetta nella preparazione della colazione all’inglese)

dadini di pane tostato all’olio evo


Preparare le omelette, sbattendo le uova con una forchetta in una ciotola, aggiungendo la panna, il sale e il pepe, incorporando molta aria. In una padella antiaderente sciogliere burro e olio e versarci metà della pastella. Cuocere come una classica frittata da entrambi i lati, fino a che diventa leggermente dorata. Quando la cottura è quasi ultimata, farcire una metà dell’omelette ancora in padella con qualche fetta di prosciutto e qualcun’altra di formaggio, chiuderla e sigillarla, toglierla dal fuoco. Procedere ugualmente con il resto della pastella.


Per l’accompagnamento, preparare una veloce insalata di spinacino, condita con olio-aceto-sale (o con la vostra vinaigrette preferita), qualche pomodorino al forno e qualche dadino di pane tostato in padella con olio evo.


Note:


-          l’omelette può essere servita anche da sola ma nel caso del brunch è perfetta abbinata ad un’ insalata (come la ricetta propone) oppure ad altri tipi di contorno tipici del brunch.

-          la farcitura dell’omelette può ovviamente cambiare secondo i vostri personali gusti e preferenze. Inoltre è possibile aromatizzare la pastella con erbe aromatiche o altri aromi, interessante è l’abbinamento con l’erba cipollina.

-          essendo la ricetta semplicissima, il trucco per renderla deliziosa è usare prodotti freschi e di qualità. Pochi ingredienti ma buoni e di prima scelta. Fa la differenza.


(my) English breakfast


Ingredienti:

per 2 persone


per le uova:

3-4 uova

sale

pepe

5 cucchiai di panna da cucina

20 g di burro

1 cucchiaio di olio evo


per il bacon:

4-6 fette di pancetta di qualità


per i pomodorini al forno aromatizzati al timo:

10-15 pomodori ciliegia, lavati e tagliati a metà

olio evo

sale

rametti di timo fresco


per accompagnare:

pane tostato


Preparare per primi i pomodorini, infornandoli in una teglia con un goccio d’olio, un pizzico di sale e qualche rametto di timo sparso qua e là. Cuocere per almeno 25-30 minuti a 180°.

Per le uova, sbatterle velocemente con sale, pepe macinato al momento e 3 cucchiai di panna. Trasferirle in una padella antiaderente dove avrete sciolto burro e olio e iniziare la loro cottura. Mescolare le uova, sfaldandole e appunto strapazzandole con un mestolo di legno, facendo in modo che rimangano sempre morbide e non si cuociano eccessivamente. Quando sono ancora un po’ indietro di cottura, aggiungere i restanti 2 cucchiai di panna, che serviranno a tenere morbide e cremose le vostre uova, e aiuteranno nel caso in cui le aveste fatte cuocere troppo.

Per il bacon, far arrostire le fette su di una padella antiaderente senza grassi, facendole abbrustolire, rendendole croccanti da entrambi i lati.

Servire le uova ancora calde, con il bacon croccante, i pomodorini al forno e il pane tostato.


Note:

-          l’idea in più è quella di servire la colazione a mo’ di “tutto in uno”, formando con il pane tostato delle bruschette da colazione, con il bacon, le uova e i pomodori, tutto su un’unica fragrante fetta di pane.

-          La cottura dei pomodorini è indicata per persone che apprezzano i pomodorini “semi al forno”, ovvero pomodorini non completamente disidratati, ma ancora un po’ succosi e polposi. Per ottenere un risultato simile al pomodoro secco basterà allungare la cottura di un’altra mezz’ora.

-          io preferisco usare un pancetta piuttosto dolce, anche se la tradizione inglese richiederebbe quella affumicata, appunto, il bacon. Sta a voi scegliere. Io preferisco sapori un po’ meno decisi e sapidi, però come sempre, dipende dalle preferenze. 


Viewing all 95 articles
Browse latest View live